Monday, September 30, 2013

Emboss Resist

Can you believe that it is the end of September already?  I always wonder how fast time flies by.  I am sharing a card today using September Stamp of the Month.  This set comes with two big stamps - one with a fall theme and one with a winter theme.  I have used the fall-themed one many times but have yet let the winter-themed one see ink.

I've decided to let it see some embossing ink!


I'm afraid the picture was not taken by a professional photographer nor with a professional camera so it is not capturing all the details.  I hope you'll see that the middle panel is embossed with clear powder (but it may appear to be embossed with white powder because the card base is white), then I've used some red and green ink to buff over the entire surface.  I added a hint of brown to delineate the border for a final touch. 

It has been a long while since I last did emboss resist and I almost forgot how fun it is!  At first I wanted to do trapped emboss resist (with a background stamped before embossing) but the embossed image does not have enough solid background so the result was so busy that I felt dizzy just looking at it.  I tried a couple of times with different colors but none led to a nice result so I gave up that idea and settled on emboss resist. 

My card is based on the sketch provided by Sketch Saturday:


and is using the technique requested by 52{CCT}:


and is entering the following challenges:
Crimbo Crackers - Embossing
CHNC Challenge - use three main colors
Totally Gorjuss - traditional Christmas colors
Christmas card challenge - Anything Goes

Thanks for stopping by!

Sunday, September 29, 2013

A few of my favorite things

The theme at Heart 2 Heart Challenge is "A Few of My Favorite Things".  Wow, my favorite things?  Let me make a list.  I love Close to My Heart products and I recently fell in love with Cricut Craft Room and if you saw any of my posts this past week you know that I am currently addicted to window cards.

I was asked to share the girly version of the window card that was originally shown here and I'm happy to oblige. 

Like I said I replaced the stars with hearts to make it a cute little girl's card:


Another picture from a different angle:


Similar to the boy card, this card shows a full heart on its face when it is shut.  When you open it up, you see another two hearts.  I planned on putting her full name in the small Sunset heart inside and stamp a greeting in the bottom panel. 

Even though I thought I should be playing a lot with the new artbooking cartridge, I actually am spending more time with Artiste and Art Philosophy and Cricut Craft Room.  Cricut Craft Room let me discover new ways to use traditional shapes, like the hearts and stars, and even squares and circles.  The card here used Art Philosophy (for the hearts and letter R) and Cricut Craft Room.  The card base in a retired clear card from Close to My Heart.  I hoarded quite a lot and they are finally seeing some light!

If you have not already done so, I highly recommend that you try Cricut Craft Room, with any Cricut cartridges that you have.  I hope you will discover new ways to use your existing shapes and take your creativity to the next level.  If you'd like to learn some basics of Cricut Craft Room, you may want to see the video here.

Thanks for stopping by and happy crafting!


Saturday, September 28, 2013

An addiction

The idea of window card continues to stick to my head so I can't resist to make another one to share.  The card is based on the sketch from Atlantic Hearts Sketch Challenge:


I hate that I lack the skills to picture a window card:


It was very difficult to take a picture of it so I temporarily stuck the card shut.  Then when the adhesive is removed:


I like that window cards make it stand apart from store bought cards, and I like sentiments like this that ties the inside of the card to the outside.  I used to like inserting poems in the card, but I hate that it was a lot of writing involved (you can tell how good my calligraphy is, but I insisted hand-writing because printing it defeats the purpose of a handmade card) and the poems are not necessarily truly to the point.  After all, I think it is the stamping, cutting that I love the most and I could use more time stamping than looking for the perfect poem.

My card is entering the following challenges:
Hiding in My Craft Room - Woman's Birthday
Sweet Stampin' - Things with Wings
2 Sisters Challenge Blog - Anything Goes
Through the Craft Room Door - Anything Goes
Bearly Mine - Anything Goes
Addicted to Stamps and More - CAS

Thanks for stopping by and Happy Crafting!

Thursday, September 26, 2013

Window card again

I mentioned that I am drawn to window cards recently in yesterday's post.  That Christmas card was not too difficult, as there is a coordinating stamp for the die.  As long as I am careful in lining up the opening when I stamp, I can't really mess it up.

Today's card is quite different.  It is a result of trials and errors.  I am really happy with my experiment!  I started playing with this idea of window card because I am going to attend quite a number of kiddos birthday parties.  Plain cards are probably too boring for kids, and even though I tried some interactive cards, I am a bit worried that those tiny parts might come off and become a choking hazard.  I settled with clear cards, partly because I have had them for more than 2 years but they were not even opened, and also because they are quite different from a store bought card.  Since I was going to use a clear card, I wanted to make something really special, and that led to the idea of window card.

This card is going to a boy so I wanted to make a lot of stars for him:


If you look closely, you'll see that the yellow star appears that it is suspending on the clear card.  The "inside" or back of the card has a bigger orange star so when the card is closed, it looks like it is a big orange star decorated with layers.  Of course, when you open it you will see that it is not just one star, but many many stars.  How fun.

The kid's first name begins with a K so I put a K in the middle of the yellow star.  I really like the font of this K and can't believe that even though I have had this die for a long time I have yet used it! The bottom panels serves as the place for me to write my greeting.  One of the things I'll put is of course "You are a Star!" and he truly is.

That explains the boy version of this card and I can't let this great idea stop here.  I have made a girl version of this card, except that it has a big heart instead of a big star.  The girl version is more difficult because as the heart size grows the proportion does not grow exactly proportionally.  I managed to make it work but that involved quite some experiments.  Did I mention that it was all done by Cricut Art Philosophy and Cricut Craft Room?  Thanks to them I can cut the shapes out with my calculated measurement, otherwise my idea may not be materialized.

Happy that I got these two cards done.  A couple more to go before the end of this year.   Any ideas for kiddos' cards?

My card is entering the following challenges:
Make it Monday Challenge
The Cutie Pie Challenge Blog - for the boys
Clear it Out Challenge - Boys, Punches/Die cuts
Tuesday Throwdown - Clean and Simple
Shopping Our Stash - Kids
Oldie but a Goodie Challenge - Punches/Die cuts
Sister Act Card Challenge - Anything Goes
Artistic Inspirations - Anything Goes/Bright Colors
Paper Crafting Journey - For a Boy

Thanks for stopping by!

Cricut Craft Room

Let's watch the video below and learn the basics of Cricut Craft Room!


Tuesday, September 24, 2013

Merry Christmas

In addition to embossing, I am also addicted to window cards recently.  I've made two for two kiddos that are turning one later this year, and I am sharing a Christmas card with a window today:


This card is probably one of those that gives me the hardest time to capture the details.  I have tried different angles, tilting the card using different objects, using my hand to hold it, etc.  Boy, the time I spent on taking a picture of it was probably just as much as making the card itself.

The picture shown is a compromise among various things.  I hope you can see the window, which is a tree, and through the window it is a coordinating stamp.  Do you see some sparkling things on the right of the card?  It says "Merry Christmas" and was embossed with Ranger Polysparkle Embossing Powder.  It is the culprit that made the card difficult to picture.  When you lay the card flat, the embossed sentiment looks like clear embossing powder, but if you tip it to the light or bring it closer to your eyes, you see a little rainbow effect.  It is very subtle but nonetheless makes it more interesting.

One thing I like about this card is the lower green panel.  It is Pear cardstock stamped with a background stamp in Olive.  I like tone-on-tone but this one where the stamped image is one step deeper than the cardstock is just equally lovely, and it matches with the red panel where the polka dots are a tone lighter than the background.  Nice, huh?

My card is entering the following challenges:
Christmas Stampin All Year Long - Christmas Cheer, Anything Goes
CHNC Challenge - Stamp, Stamp, Stamp
Paper Creators Craft - Make it Christmassy
Totally Gorjuss - Dotty
Retro Sketches


52 {Christmas} Card Throwdown - Christmas Tree


Thanks for stopping by!

Sunday, September 22, 2013

Happy Thanksgiving

I am very fond of embossing these days and today's card has two portions with embossing on it. 

The layout of the card comes from Atlantic Hearts Sketch Challenge:


I have the panel, background and sentiment ready.  Some embossing was done here:


The sentiment was embossed with copper embossing powder.  Can't believe that this color works so well with Fall cards!  The dark green panel on the left is a self-made patterned paper.  I randomly stamped three small images for the background and heat embossed them with clear embossing powder.  I like random stamping - it is such a creative outlet!  This dark green panel also gives some texture, gloss and dimension to the card. 

Now onto the butterfly.  Since my card is a fall card, I was inclined to use leaves instead of a butterfly.  However, one leaf seems too lonely on its own, two leaves do not seem quite right.  What about three?  Not that good either.  At this point, I tried to add certain things to the leaves.  I punched out a scalloped circle, added the hemp and the die cut word "fall".  Putting them together in a cluster is far better than the leaves alone.  Those leaves alone remind me of a Grade 1 workbook showing kids how to count.  LOL. 

My card is entering the following challenges:
4 Krafty Girlz Challenges - Anything Goes
A Creative Romance - Dies or Punches
Jo's Scrap Shack - Anything Goes
Dream Valley - Autumn
Fashionable Stamping - Autumn colors
Friday Mashup - Fall and/or Paper Piecing
An Inky Situation - Fall Leaves


Thanks for stopping by!

Boo

Let's have some fun with Halloween cards.  I've mentioned in my previous posts that I don't make that many Halloween cards.  Usually I make a couple for the kids.  Even though I do not make that many Halloween cards, I truly enjoy making every one of them.  Kids love Halloween and whenever I think of their smiles when  receiving the card and the candy, that makes me smile too!

I have made one based on the sketch at Monday Lunchtime Sketch Challenge:


I have rotated the sketch and made a horizontal card:


I love that mummy!  It's super cute but not too scary.  I stamped it on a patterned paper which has a cream color and splotches of orange, that paper just makes the linen bandages more realistic!  I already know that the kid who will receive it will pretend to be a mummy like the image and go after me.  She is such an adorable girl!  I am not a big fan of fussy cut but I think for this card, the cut was well worth it!

My card is also entering the following challenges:
Word Art Wednesday - Anything Goes
Penny's Paper Crafty Challenge - Two or more patterned papers
Amusing Challenge - Pearls and Gems
Challenges 4 everybody - Anything Goes
613 Avenue Challenge - Color Challenge - one color from each column (Black, Purple, Orange)


Friday, September 20, 2013

Hats off to you

Just a quick post today as my eye feels a bit funny after the warm compress.

I am sharing a card based on the sketch from Seize the Sketch:


I've made a Halloween card using the new Laughing Lola paper, Wicked, a retired Stamp of the Month, retired tulle ribbon and some black enamel dots:


I do not make that many Halloween cards, just a couple for small kids.  This one, however, will go to a young lady.  The inside of the card says "Have a wicked Halloween", which sounds pretty cool!

My card is entering the following challenges:
Make it Monday
The Cheerful Stamp Pad - I Love Your Hat
Created with Love Challenges - Anything Goes
Creative Corner Challenges - Halloween

Thanks for stopping by!

Pin It

Thursday, September 19, 2013

Coloring fun

Finally I am playing with this set called Count Your Blessings and having some fun with coloring.  I have always admired others who spent hours on coloring one image and that image is just a WOW.  It looks realistic, dimensional and the image definitely draws everyone's focus.  As a novice I stick to color pencils, watercolor pencils and some markers. 

I think it is acceptable for my first attempt with markers:


This is quite difficult as a big proportion of the image belongs to the orange family but alas I don't have that many shades of orange!  I blended with some brown, red and yellow to make do.  I think I have tried to stretch beyond my comfort zone to color things with some "unnatural" colors. 

One thing I am happy with, however, is the halo effect.  I heard that it is really popular for any colored image so I added that blue shadow to pretend that I'm quite a maestro in coloring.  The light blue does add some depth to it.  Even though I am not a master in coloring, I am a master in pretending to be one.  LOL.

The sketch of my card is based on the one provided by Tuesday Morning Sketches


My card is entering the following challenges:
Our Daily Bred Design - Fall colors
Crafty Sentiments Designs - Fall colors
Polly Craft Challenge - Harvest colors
Perfect Sentiments - Fall
Tammy Scrapin Corner - Anything Goes

Thanks for stopping by!

Pin It

Wednesday, September 18, 2013

A Season of Blessings

I can totally feel that that Fall is secretly approaching.  It is very windy when I am typing up this post.  Perhaps it is the change of weather I am really into making Fall cards!

Today I'm sharing one based on the Muse at Muse Challenge.  Please check out the Muse here.  Marion Vagg has made a pretty card with a red background stamped with a background stamp in the same hue.  She has put a white tag in the lower left side of the card where the tag is accentuated by a beautifully colored rose and some leaves.  Her fun sentiment made use of the die cut "you" and a stamped image "are loved."

I first drew inspiration from the layout of her card.  Her tone-on-tone background reminded me to use the Flirty paper, which has leaves as its pattern.  Using the same element and design, I put a tag in the left side, but my tag does not carry the sentiment.  Instead, I put the sentiment in the top right corner to balance it out.  To emulate her fun way to place her sentiment, I chose a stamp that made use of two fonts.


I must say that I had a lot of fun playing with the leaves and the turkey.  The leaves were cut with the Tim Holtz dies and the turkey and the tag were cut with Cricut Artiste and Art Philosophy cartridges respectively.
I used 3 distress inks to color the die cut.  They were first covered with Scattered Straw, then the exterior part blended with Wild Honey and finally the edges were inked with Tea Dye.  It was a lot of fun to see the layers of the colors.  I was tempted to do the "flicking water" technique but I think I should leave it this way.  It is one of those moments that I debated whether I should add more to it. 

I like it and can't help looking at it.  :)

My card is entering the following challenges:
Bitten by the Bug - Fall
ABC challenges - Fall
Crafting Desert Divas - Fall
Crafty our passion - Fall
Lexi Creations - Autumn colors
The paper nest doll - Happy Fall

Thanks for stopping by!

Pin It

Tuesday, September 17, 2013

Christmas card

I have made a couple of fall cards and thought I should get back to my Christmas preparation.  I was browsing for some sketch and color combo for my inspiration and I found the sketch at Sunday Stamps Challenge:


and I found this color combo from 52 Christmas Card Throwdown:


I was pretty much set on having Kraft cardstock as the card base, then I thought I would use white cardstock for the middle panel and red scalloped edge.  What I added was some texture by embossing folder.  I love dry embossing as it is indeed a quick and easy way to give a lot of interest to any card:


With a die cut ornament with a white embossed image, some baker's twine and a stamped sentiment, this card came together quickly.

My card is entering the following challenges:
A creative Romance - Dies or Punches
CHNC - something that has been cut
Paper Creators Craft - Make it Christmassy
Crimbo Crackers - Quick and Easy

Thanks for stopping by!

Pin It

Sunday, September 15, 2013

Happy Autumn

I have fallen in love with this stamp set Happy Autumn and am always looking for ways to use every single stamp in the set.

The floral images are great and so are the sentiments.  As the temperature is getting lower I am inclined to make more Fall cards.  

I am sharing a card based on the sketch from Mojo Monday:


I like the simplicity of the sketch and I've used the grid technique as suggested by Just Us Girls on my card:


This is my first time playing with this grid technique and I like it A LOT!  It is easy and convenient but such a technique adds so much fun to the card!  Thanks JUGS for sharing this technique with us! Imagine if the grid technique not used, my card would be rather dull and flat.

While making this card, I came to realize that I do not have any brown embossing powder for the sentiment "Happy Autumn" so I used the bronze embossing powder from Ranger.  I've only used that on manly projects but am happy to find out that it works great on a Fall card.  This is one of those "surprise" moments!  Yay!

My card is entering the following challenge:
613 Avenue - Anything Goes/ Fall
Come and Get it Challenges - Focal image on the side
Jo's Scrap Shack - Fall
Sister Act Card Challenge - Anything Goes
Aud Sentiments Challenge - Fall
Catch the Bug Challenge - Fall

Thanks for stopping by!

Pin It

You can never have too much HAPPY

What a cute sentiment!

Just a quick post to share my card and one of my favorite stamping techniques:


I used the back of the stamp to make the colors yellow then stamped it normally in blue so the flowers have a blue outline:


The sketch of the card came from Monday Lunchtime Sketch challenge:

My card is also entering the following challenges:

Paper Crafting Journey - Flowers
4 Krafty Girlz - Anything Goes
Creative Knockout - Recipe challenge: image, sentiment, patterned paper and embellishment

Thanks for stopping by!

Pin It

Saturday, September 14, 2013

A difficult sketch

I love sketch challenges but when I stumbled upon a difficult one I have mixed feelings.  I want to challenge myself and I will spend an indefinite amount of time on it.  I tend to forget laundry, dishes, chores and the like.  Everything has disappeared but that sketch.  You can tell that after I have spent a lot of time on it but am still unhappy with the results, I become stressed, tired, frustrated, and angry at myself for wasting so much time and materials, let's not forget the big loads of laundry and piles of dishes. 

That was me.

I've become better.  When I see a difficult one, I let the ideas float in my head and I do not stay in my craft area.  Instead, I think about it while I'm doing laundry and dishes.  The sketch also appears on the carpet or sink when I am vacuum-cleaning or scrubbing. 

This has been much better. 

I came across a difficult sketch earlier this week.  It is provided by Atlantic Hearts Sketch Challenge:


I kept thinking about it this past week but when I finally got to my craft desk to materialize my idea, it wasn't so bad:


I hope the little kid that receives it will like it!

It is also entering the challenges at
Creative Fingers Challenge - Add a Sentiment
Jelly Park Challenge - For kids Thanks for stopping by!
Pin It

Thursday, September 12, 2013

Fall card again

Yup.  Two Fall-themed cards in a row.  I certainly like yesterday's card but I like today's card just as much.

Let's first take a look at the sketch.  It is one from Sketchbook Saturday Challenge:


And you really need to check out Iwona's card here.  Her card is awesome.  I really appreciate her use of colors, something I am always struggling with.  I would have never thought of using a bright blue for a solid bird image, nor would I tried a light, sky blue for a feather.  These unconventional colors bring lots of fun to her card and I like it A LOT.  The next thing on my wish list is the feather die.  Shhhh~~  don't tell my dies in my drawers......

Onto my fall card.  This year for whatever reason I have been having a lot of fun making them.  My favorite is usually Christmas cards but Fall-themed cards are gaining popularity.  I am making more and more of them. 


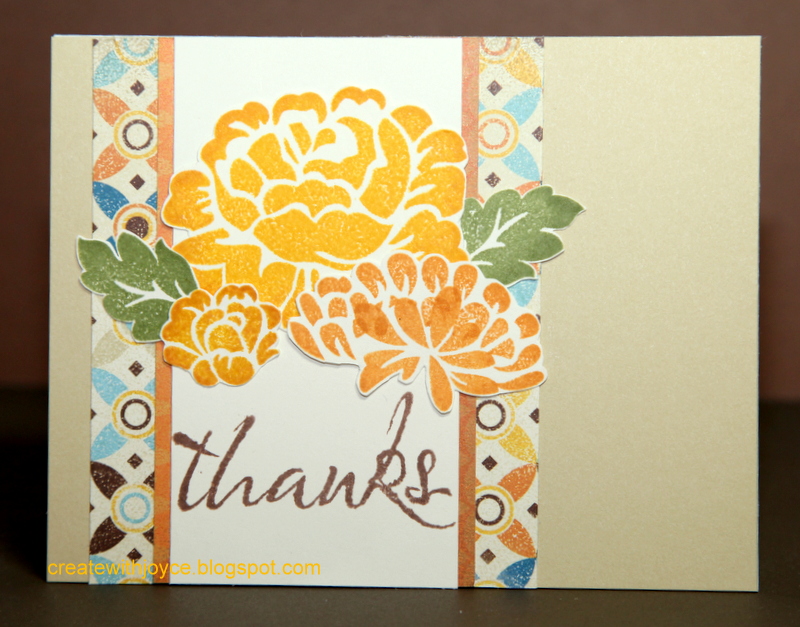
The patterned paper, Dreamin', came from the 2011 Close to My Heart catalog.  Don't ask me why I have never let the paper pack see any light.  But if you do ask me, I will briefly tell you that I have this disease of holding onto pretty paper for a long time before I can break the package open to use it.  The cause of the disease is the fear that the pretty paper will be ruined by an unsuccessful attempt to make a card, a layout, or any project.  My disease was diagnosed back in the stone age, but unfortunately there is no cure for the disease, at least no medication works for me thus far. 

I am glad that I've finally overcome the fear and used the paper on this card.  In fact, I'm starting a layout with this paper pack.  The layout was a happy day I spent with my cousin when she visited me in Fall 2011, the birth date of this paper pack.  What a coincidence!

My flowers were stamped using rock and roll technique.  The outer edges have darker colors than then center of the flowers.  This is my favorite stamping technique!  Just a quick and easy way to add color and depth to any image.  I've also used masking technique on the sentiment.  The sentiment reads "Give Thanks for all you have" but I masked off everything but "Thanks".  Masking is also one of my favorite stamping techniques and it could give an image a totally different look.

My card is also entering the following challenges:
Clear it out challenge - Thank you card, and the Dreamin' paper pack that I have been holding onto
Tuesday Throwdown challenge - Anything Goes
Shopping Our Stash - Favorite stamping technique
Just Inspirational Challenge - Flowers
The Perfect Sentiment - Thank you
Pollycraft challenges - Harvest Colors
Crafting By Designs - Anything Goes

Thanks for stopping by!

Pin It

Wednesday, September 11, 2013

Thankful

On this day where solemn ceremonies are held, I just want to share that I am thankful for a lot of things.  Being thankful is good, but I'd like to share that thought with others.  One of my ways of doing that is to send out a card.

I'm sharing a Thanksgiving card today:


I really like this stamp and the collage of words.  I particularly like "blessings", "hope", "thankful" and "faith". 

The turkey was cut using Artiste cartridge - easy peasy.  I added some colors to the turkey then stamped the turkey image.  Because of the layers of colors, it looks quite dimensional.  Very cute.

My card is entering the following challenges:
Through the Craft Room Door - Anything Goes
Crafty Sentiments Designs - Anything Goes
My Shari Crafts Challenge - Fall colors
613 Avenue Create - Anything Goes
The Corrosive Challenge - All About Fall
Bearly Mine Challenge - Fall Color challenge


Thanks for stopping by!


Pin It

Tuesday, September 10, 2013

Photography

Taking good pictures of my cards remains the biggest challenge for blogging.  I like playing along the online challenges but the photography part is my weakest area that needs a lot of work.

I've tried various ways to take pictures for today's card but it was impossible with my skills and my tools to capture everything.  It is a cute simple Halloween card:


If you click on the picture I think you can see the sentiment is embossed with glitter.  It give a rainbow effect under light and it works really well with the sentiment for Halloween but the picture has discounted the effect so badly.  :(

Did you see the cute embossed owl?  It has a raised shiny surface due to embossing but I'm afraid the picture has not done its justice here. :(

Does that give me a good reason to buy a fancy camera??  Let me think about it!

Today's Halloween card is based on the sketch from Sweet Stop Sketches:


It is entering the following challenges:
Catch the Bug - Anything Goes
Nutcrafters - CAS
Make it Monday - Anything Goes
Craft Your Passion - Glitter and Gloss
Totally Gorjuss - Anything Goes

Thanks for stopping by!
Pin It