Thursday, July 31, 2014

12 Tags of 2014 - July

The expert of procrastination is playing along 12 tags of 2014 on the last day of July.  It is totally an experiment for me as I didn't have all the materials suggested.  Having said that, this has pushed me think really hard what can be used as substitutes and I must say this is one way of enhancing creativity.

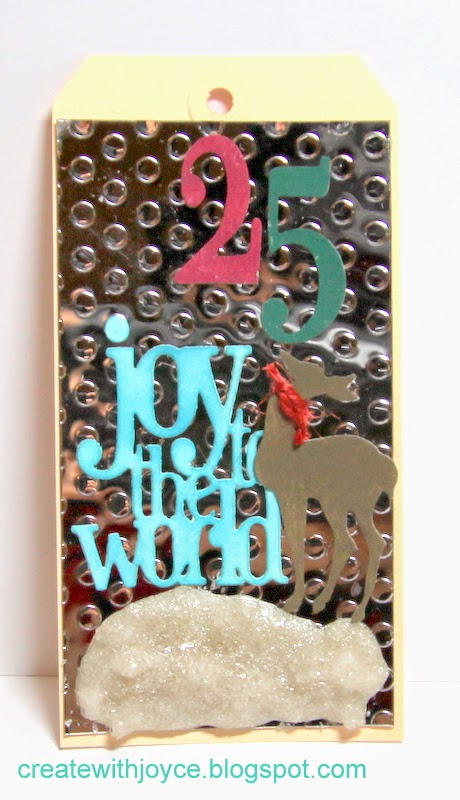
My tag is rather simple:


What are the experiments involved in it?

The snow and the mirror sheet.  I admit that I have not practiced each of the techniques well enough to remember the requisite materials for each technique.  I also admit that even though I am always excited to see a new tag on the first of every month on Tim Holtz's blog, I do not always remember to order everything needed to play along the challenge.

This time, the biggest trouble is that I can't find my UTEE.  So I tried a different recipe to make the faux snow.  My recipe is glass glitter, dry distress stickles, pumice stone distress glitter, clear rock candy distress glitter, poly sparkle embossing powder and a tremendous amount of glossy accent.  I reviewed day 6 of Tim Holtz's 12 days of Christmas in 2008 and he said that the mixture did not look like it's sticky but it would stick to anything.  He even warned us to wear gloves.  Well, I guess I wasn't confident that the mixture was sticky enough so I added more and more glossy accent, so much so that it appeared to be semi-liquid.  It looks like it is melting snow to me.  Hahaha~

The second problem encountered while making this tag was that I didn't have any shrink plastic and I couldn't find any plastic packaging either.  Let's try the mirror sheet, I thought.  I haven't tried using it with embossing folder and I must say that the effect is pretty cool.  It still has the mirror characteristics but the image is somehow distorted.

Because of time crunch, I didn't get to embellish it further.  Before I attach it to a Christmas present, I'll probably add some tinsel through the tag, and some snowflakes to the background. :)

I'm linking up my tag to:
The Sisterhood of crafters - die cuts and/or punches
Crafty Sentiments - Anything Goes
Penny's Paper-Crafty Challenge - Anything Goes
12 tags of 2014 - July

Thanks for stopping by!

Wednesday, July 30, 2014

Another birthday card

I'm sharing a much more feminine birthday card today.  There was no stamping involved in the card.  I used my new Memory Box Blissful Butterfly Border die and patterned paper to create the butterflies, then a Simon Says Stamp die to cut out "Happy" and a Papertrey Ink die to cut out "birthday". 


Isn't it cute?

I love the colorful butterflies! 

In case you are wondering how a border die will result in independent butterflies, here's how:  I ran the border die 4 times on white card stock.  Then I snipped off those partial butterflies but kept the three that are intact.  I got four of each of the intact butterflies and carefully layered them up - that's the white border you see on the butterflies.  It adds dimension and oomph to the butterflies.  How nice!

Then I ran the border die again on various patterned paper, picked the ones I like and arranged them to my pleasing.

I was inspired by the card made by Melania Deasy at The Cutting Edge Challenge #5:


I kept her original design and used die cuts for the main focal point.  She had open and solid flowers so I made some butterflies with a thick white borders and some without.

My card is linking up to:
Die Cuttin' Divas Challenge - Anything Goes
Pause Dream Enjoy - 3 or more patterned papers


Thanks for stopping by!


Monday, July 28, 2014

Christmas in July

I am happy that I am on the right track to grow my Christmas card stash.  :)  Thanks to the challenges in the blogland I am even more motivated to make Christmas cards.  I finally got a die set from My Favorite Things that I have been longing for and guess what I've made with it?  A Christmas card!


It is a flat Christmas card.  You may find it not too exciting but I like that it is mail-friendly.  Most of my Christmas cards are to be mailed out.  Many of them will have to withstand heavy handling as they will be sent overseas.  Nothing is more disappointing when the recipient of the card opens up a semi-wrecked envelope to find a ruined card.  In fact a sweet friend of mine challenged me to make a card that will stay intact when it reaches her without extra postage or padded envelope.  It was very sweet of her to be sooo considerate.  She adores all of the cards I sent her.  She appreciates that I always think of her.   She is not a crafter but she uses special letterhead to write letters to me that make me smile too!  Boy we also do emails and texting but the cards and letters really make things special between us. :)

I have been seeing this kind of tip-topped panel on cards so often these days.  I put this panel on the bottom and I think it is equally cute.  This odd panel is quite appealing to our eyes.  It is very special indeed.  One good thing I like about it?  It helps me use up patterned paper!  I am resisting the temptation to hoard more patterned paper.  I usually use patterned paper for scrapbooking pages but I find myself not making as many pages as before, thus I have to find a way to use up my stash.  Do you have a lot of patterned paper?  What do you do with them?

My card is linking up to the following:
Hiding in My Craftroom - Christmas in July
My Sheri Crafts - Christmas in July
Completely in Christmas - Anything Goes
Jellypark Friends - Christmas in July
Weekly Christmas cards - Anything Goes
My Perfect Life - Christmas
City Crafter - Christmas in July
Little Red Wagon - Christmas in July
The Corrosive Challenge - Christmas in July
Lexis Creations - Christmas in July
The Crazy Challenge - Die cuts and punches
Craftin Desert Diva's Craft Challenge - Christmas in July

Thanks for stopping by!

Sunday, July 27, 2014

Flowers

Inspired by the sketch at Atlantic Hearts Sketch Challenge, I've made a Thank You card:


The sketch looks like this:


Did you see the "doily" on the left of the panel?  I fell in love with that doily when I first saw it in the catalog and it was a "must-have" for me.  Too bad I can rarely use it as a doily because most of the time when I cut it, it doesn't cut all the way through. At most it leaves the cutting marks but the paper isn't cut through.  I've tried many things such as adding a shim, using new cutting plates but I just can't get it right.  Obsessed with it I decided to use it this way - it's a half circle with a lot of intricate cutting marks. :p

I've used color pencils and gamsol to color the image.  It was a lot of fun.  I can see myself doing it more often!

My card is also linking up to:
Crafty Girls Challenges - Anything Goes
Through the Craft Room Door - Anything Goes
Crafters' Café - Anything Goes
Creative Moments - Anything Goes

Thanks for stopping by!

Wednesday, July 23, 2014

Life is Good

I'm sharing a super simple summer card today:


This summer has been flying by too fast.  I have not even gone to the beach!  How about a card with a beach scene to remind me of that?

When I first saw this sketch at Sketchbook Saturday:


I wanted to make a card with the palm trees but you know, procrastination happened and I didn't make the card in time to play along the challenge.  Even though this card is very simple, I'll be honest that it's not my first attempt.  My first attempt was to offset the left tree then hang a hammock in between the palms.  Weird looking.  I tried stamping it directly onto the card and stamping it on a separate sheet of cardstock then die cut it to put on a card.  Both resulted in a disaster.  The composition is just weird.  I imagine the symmetry formed by the palms and the hammock stays on one side of the card creates an imbalance of the card.  Lesson learned.

In my first attempt, I used colored pencil but what you see in the picture above was a result of distress markers coloring, well, except for the sky, where I used distress inks from the ink pad. 

I am going to put this card in my office.  I always have a little something to decorate my office when it comes to Halloween, Christmas, V-day, etc.  But I just never have anything for summer and summer alone.  This card will serve the purpose.

I'm linking my card to the following:
Cards und More - Summer Fun
Loves Rubber Stamps - Summer Fun
Always Something Creative - Summer Fun
Crafting Musketeers - Summertime
Natalie and Amy challenge - Summertime
Lawnscaping - watercoloring


Thanks for stopping by!

Monday, July 21, 2014

Suspension card

I am sharing a Christmas card today.  It has a Christmas tree that appears to be floating in the window:


It is actually secured by the Merry Christmas banner that goes across the circle window.  It brings quite a lot of impact to the otherwise simple card!

If you want it to be more secured (I'm one of those paranoid), you could have two trees cut out and sandwich a string, then adhere the string between the patterned paper and the card base.  In that case, I do not recommend to have a banner go across the window, because the string can be twisted multiple times for the tree to spin.  That will be another fun technique to try.

I'm linking up my card to the following:
Hiding in My Craft Room - Christmas in July
My Sheri Crafts - Christmas in July
My Perfect life - Christmas
Corrosive Challenge - Christmas in July
Jelly Park Friday Challenge - Christmas in July
Come and Get it Challenge - Christmas in July

Thanks for stopping by!

Sunday, July 20, 2014

Thanks so much!

I have no idea what happened this weekend, except that time flies by incredibly fast! 

I spent a ton of time to work on my Mom's birthday card then before I know it, that's the only thing I've made.  I couldn't let this weekend go with only one card done so I've tried a new technique to make this one:


The new technique that I tried is to connect two die cuts into one piece - see "Thanks" and the banner.  I first cut the word Thanks without cutting all the way through by sandwiching the plates strategically so the t, k and s have some connecting points with the rest of the paper.  Using the same line as reference, I cut the banner die, but not the top part.  I carefully used my exacto knife to cut the top part of the banner, resulting in this one piece of die cut.  It's pretty cute and I like that the banner allows me to add extra words such as  "very much", "for everything" to further personalize the card.

This Thanks die from Lawn Fawn has been working to death, and these Lawn Fawn hearts die have been my favorite - a variety of sizes always comes in handy.  The banner die?  It came from Large Stitched Journaling Card and it's my first time using it but I'll see myself use it quite from now on. :)

For the hearts, I've embossed them with the Ranger Holographic embossing powder.  I hope the upper hearts give you an idea of how sparkling they are.  In real life it is quite special and eye-catching but wait until I've improved my photographic skills to show you on my blog.

I'm entering my card to
Moxie Fab World - Word dies
613 Create - Anything Goes
Scribble and Scrap - Anything Goes
The Craft Place - Anything Goes

Thanks for stopping by!

Thursday, July 17, 2014

Hi!

I'm sharing a very flat and simple card today.  I used the Lawn Fawn paper and the quinn's ABCs dies.  I got the new louie's ABC dies but have not yet used them.  Oh well, I'm sure there will be plenty of opportunities.


Inlay die-cutting usually involves some sort of overlapping of the dies.  However, I didn't do that for my card.  I die cut the banner out from the blue plaid paper, then cut a circle out from it.  I used the same circle die to cut a red piece of paper, out of which I cut "hi!".  Finally I cut "hi!" again from the yellow polka dots paper.

The next step is to put them together.  I put the yellow polka dots "hi!" into the red circle, then put this red circle into the blue banner.  Because there is actually no connection between the die cuts except for the edges, I put quite a lot of glue on the background patterned paper "Oh Happy Day" and I made sure that each of the die cuts stay put.

I made this card for my friend who lives far away.  I know she will appreciate the simple lines flatness of the card.  She once complained that the heavy handling has ripped off part of the card, despite the bubble envelope I've used.

I saw a rather new challenge called Virginia's View Challenge, which was started by Virginia Lu, the star crafter!  I checked out the challenge and found that Virginia has shared a lot of tutorials and samples related to die cutting for us.  How can we not appreciate her efforts?


I'm also linking my card to:
A girl who crafts - Anything Goes
Craftyhazelnut's Patterned Paper Challenge - patterned paper
Just for Fun - Anything Goes
Reves 2 Scrap - Anything Goes
Sister of Craft - Anything Goes
Creative Moments - Anything Goes
Moo-Mania and More - Anything Goes
Crafty Girls - Anything Goes

Thanks for stopping by!

Wednesday, July 16, 2014

Best Wishes

Happy Wednesday!  It has been a long long long time since I last played a color challenge.  While I was looking for one to play along, I saw the Lawnscaping Challenge.  This challenge runs twice a month and wow, it is the 85th challenge this time.  Where was I for their past 84 challenges?

This time, the challenge is about summer colors:


I used some teeny tiny floral images from Lawn Fawn Flutter By set to create my own background.  They are in orange and yellow.  Then I used Mustard Seed and Spiced Marmalade Distress Inks to create full color coverage on white card stock.  I used the same technique to create the blue bands with Salty Ocean.  I stamped the butterflies on the orange-yellow piece and fussy cut them out.  Boy, I cut three butterflies with my own pairs of scissors!  Have I been spoiled by coordinating dies?

The antennae of the butterflies are too thin to be cut (for my skills, but yes for those who are expects these antennae are no challenge) so I stamped the antennae onto my background using masking technique then I stuck the fussy cut butterflies on top.


I was looking for a great sentiment to go with the cart and thought that "best wishes" would be nice.  It is an older stamp set from Lawn Fawn So Much to Say.  I found it in a local craft store recently and have been playing with it happily.  To add some finishing touch, I added the Wink of Stella glitter onto the butterflies.  The glitter is best captured by the butterfly anchored to the sentiment.  In real life the glitter makes it very nice.

My collection of Lawn Fawn stamps and dies has been growing steadily but I never forget this Flutter By set.  It is my very first Lawn Fawn stamp set bought in a craft store while I was travelling.  Yup, I can't omit the visits to local craft stores while travelling.  This is a must in the itinerary! :)

I'm linking up my card to:
Crafting from the Heart - Anything Goes
Fantastic Tuesday - Anything Goes
Lawnscaping Challenge - see above

Thanks for stopping by!


Tuesday, July 15, 2014

A Tag on a Christmas Card

I'm doing it again.........

I'm sandwiching the cute summer fun card between Christmas cards on my blog........


It is just a simple Christmas card.  I used a patterned paper as the background, then added a band towards the bottom of the card.  The band itself is decorated with a strip of patterned paper from the same 6x6 paper pack.  Then I die cut the tag, stamped the tag image onto cream-color cardstock, trim it to fit the tag's size, then added an owl, a sentiment and a row of hearts.  I didn't spend much time coloring the owl, but because of the red tag and the red band, I've given him a red scarf! :)

My card is linking up to:
Tag You're It - Include a tag
Crafty Boots Challenge - Christmas in July
PDE Linky Party - Tags
Inky Chicks - Christmas in July
Holly Jolly Christmas Challenge - Christmas critters
Scrap-Creations - Christmas in July
Digi Choosday - Tag it
Crafty Sentiments - Christmas in July

Thanks for stopping by!

Monday, July 14, 2014

Summer Birthday

If my biological clock follows the cards I make, I will be exhausting to keep up with the constant abrupt changes of weather.  I was sharing a Christmas card yesterday and now I have a summer birthday card:


This card was made with the card sketch at Sketchbook Saturday as a basis:


Do I need to say anything about Iwona's sketches?  I love her blog and her cards!  Of course I love her sketches and her challenge - they are always a great source of inspiration.  There have been many times that even though the time to link up to her challenge has passed, I still "played along" just to have fun and be inspired.  Check out her blog and I'm sure you'll love it!

I first played with my Lawn Fawn Life is Good stamp and die set to create this card (Oh this card was posted in between Christmas cards too, see what I mean about adjusting my body to accommodate different weathers shown in my cards?).  It was a lot of fun and I wanted to see if I could play with the set with Iwona's sketch.  This time I colored the images with color pencils and gamsol.  Just as fun as coloring them with distress markers!  As much as I love butterflies on my card, they must yield to a beach scene this time!  Among all the elements on the card, my favorite is the flip flops.  They are so cute and they are the signs of beach for me. :)

I do think I have another Christmas card lined up but........let me see if I can get something else posted so I can feel the summer breeze on my blog for longer. LOL.


I'm linking my card to:
Through the Purple Haze - Happy Birthday
Stamp and Create - Birthdays
Craftin Desert Divas - It's summer time
The Crazy Challenge - my summer vacation
Crafty Calendar challenge - summertime fun
Little Claire - Summertime
Stempelsonne - Summer
Fashionable Stamping - Dreaming of Summer

Thanks for stopping by!

Monday, July 7, 2014

Christmas!

I was flipping through the *new* Close to My Heart Annual Inspirations and found a card that I really like.  It was made with the *new* Artfully Sent Cricut Cartridge. 

Sadly, I don't have the cartridge yet, but I wanted to make something similar so I explored my cartridges and found that I could create an overlay with the Artbokking cartridge and made a simple card:


This card is not as nice as the one shown in the new Annual Inspirations but very similar.  My guess is that the overlay created by the new cartridge was made specifically for cards while this overlay on my card was made for scrapbooking layouts or mini-albums so the size look a bit different.  I used last Christmas's Sparkle & Shine paper pack, the red shimmer trim and washi tape for the banners.  The sentiment came from the cardmaking workshop on the go and I put it on an Artbooking cut label shape.

Five more months till Christmas.  I gotta catch up with Christmas cards more diligently!

Thanks to the following challenges that I'm linking my card to, making Christmas cards in the summer seems more fun:

My Bestie Norge - Christmas in July
My Perfect Life - Anything Christmas
Completely Christmas - Anything Goes
The Glory of Christmas challenge - Anything Goes
The Squirrel and the fox - Christmas in July
Aud Sentiments Challenge - Anything Goes
Crafting by Designs - Anything Goes
Creative Moments - Anything Goes

Thanks for stopping by!

Sunday, July 6, 2014

Hello!

Hello!

For those in the US, I hope you are enjoying your July 4 weekend.  Mine is filled with a lot of good (barbecue) food, friends and laughter, World Cup and a lot of fun.  The only thing I could complain about is that I didn't get to craft as much as I would love to, but that's okay.  I'll get to those projects later.

I did start playing my Life is Good set from Lawn Fawn and wow, once I started I couldn't stop.  It is a fun "build your scene" set and I can't decide how I want to set my scene.  Coloring each elements took me quite some time too, then it was laying the pieces into their right place.  This Hello card looks very bright and cheerful:


It is based on the sketch from Atlantic Hearts Sketch Challenge:


Perhaps it's July 4, perhaps it's the hot weather.  I really wanted to create something with a summer or beach theme.  Just by making this card I feel that I'm enjoying the sun and the sand already. :)

I'm linking my card to the following:
Catered Crop - Summer lovin
Come and get it challenges - Cool things for summer
Crafty Calendar - Summertime fun
Hiding in My Craft Room - Think Summer
Chocolate Coffee and Cards - Summer days
Fussy and Fancy - Summertime
Crafty Little Fairies - Summer fun
Time Out Challenges - Fun in the sun

Thanks for stopping by!

Tuesday, July 1, 2014

Simple (and quick) Christmas cards

Time to work on building the Christmas card stash again!

This time I'm sharing one that is an extremely simple and quick to put together:


I can't think of anything that can be simpler than this.  This is based on the sketch from Sketchbook Saturday Challenge:


My honest self will tell you that I wasn't in the mood of making Christmas cards.  I just wanted to play but I knew that I should get some Christmas cards done.  I saw on Iwona's blog that I didn't play this particular sketch so I used it as my template of my Christmas card.

I did want to stamp the entire background with snowflakes but for some reason the snowflakes were not random enough and the colors didn't quite coordinate to my pleasing.  The solution to that problem is patterned paper, I thought.  So I took out my 6x6 pad and used one sheet for the background, cut some pennants from red cardstock, embossed the greeting in gold and it's done.  Even though it is extremely simple, I hope it will nonetheless serve its purpose.

I'm linking up my card to the following:
Christmas card challenges - Anything Goes
My Perfect Life - Anything Christmas
The Squirrel and the fox - Christmas in July
Completely Christmas - Anything Goes
CHNC - Let's get sentimental
My time to craft - Christmas in June

Thanks for stopping by!