I just remember that there was a Christmas card I forgot to post:
It is a window card where I've put a piece of acetate on the back of the window then I've attached the snowmen on the acetate. It adds a lot of fun to the card - the looks are different when it is open or close.
I didn't have the idea when I bought this Ready Set Snow stamp & die set from Lawn Fawn, but I've noticed that my Tank You card herehas got a lot of likes and re-pins from pinterest so I thought, why not create a similar one?
I will be away for the next several days so there won't be any posts before the end of 2015. I wish everyone a safe and happy celebration for the new year!
Planners are raging in the craft industry right now. If you are like me who relies on your phone calendar for appointments and planning, you may be a bit disappointed by this trend and even think, "Why do I want an extra book in my purse?" You may even be puzzled by those planner addicts who have more than one planner - one for work, one for social life, one for each child, etc.
I was not extremely excited to learn that Close to My Heart has a new product called Everday Life album, with accompanying planner pages and roller stamp because, like I've mentioned, I am not a planner addict. But then I thought, I'll just grab the album to see what I could do.
My album has arrived and I LOVE LOVE LOVE IT!! I like the de-bossed gold foil flowers on pitch black cover. It is so elegant. The album is very sturdy. And guess what? This album works with the My Crush Everyday Life pages and we are having new memory protectors that fit in to this album perfectly. You can mix these products to create your very own personalized planner, album, memory book!
The good deal is that you could buy this gorgeous album, the accompanying planner pages and roller stamp as a bundle for only $29.95, which is 15% off the retail price!
Watch the video to learn more about this new product!
Happy Thanksgiving to those of you who live in the US!
I love Thanksgiving. I love showing gratitude. Yesterday I gave a card to my co-worker F to thank her for being so awesome. I couldn't believe that she burst into tears and we gave each other a hug. Not that I have any plans to leave my current position, but if things happen, I would regret not telling her how much I appreciate her. F is not a emotional person so her reaction was a bit of a shock to me. Nonetheless I'm glad I showed my gratitude and I encourage you to do the same.
This was not the card I gave F, but the sketch of her card was the same. I love recycling. :P
Last Sunday I reported that I wanted to send 75 cards to the Caring Hearts Card Drive. I have been working hard last week and yesterday I finished another batch so I have 100 to send to the Card Drive!
I just went to the post office and put my cards in a priority box. They will arrive in Texas in two days.
I feel so good about sending cards to those in need. The thought that my cards will bring a smile to someone warms my heart.
There's still little time to send your cards to the Card Drive. I encourage you to spread the joy of the holiday season. If you can't make it, send your cards to local senior centers or hospitals. I'm sure they will appreciate it.
Now that this mission is accomplished, I'm off to making cards for my family and friends!
I am so happy that I'm participating in the Caring Hearts Card Drive this year! In previous year I meant to join but either procrastination or other things blocked the way. This year, I was determined to do it and I've already got 58 cards. This is part of them:
I am hoping to send 75 cards so I have 17 to go. Nonetheless I'm happy I have at least 58 ready.
I'll admit that my signature on the bottom of the card got more and more illegible towards the end of the pile. But whenever I think of the smile on the recipient's face it brings a smile to my face too!
I have been having a productive week at work and almost forget to put a post here. I have a simple card to share today:
This card was created to satisfy my craving card-making. :P I didn't have any purpose in mind, nor did I have a recipient in mind. In fact, I just wanted to make a card using this Lawn Fawn set Love You A Latte that I bought at least a year ago. I admit I'm guilty to realize this stamp set has been waiting to be inked for a year. The good news is that I finally broke it open and used it.
At the time I bought it I was hoping to use it to make cards for my co-workers. Many of them were coffee-lovers. However, starting Spring this year, many of them stopped drinking coffee for various reasons. This was perhaps the reason this stamp set was forgotten.
Nonetheless, this stamp set has many other fun images I could use for non-coffee drinkers. There are images for tea, for instance, and the sentiments are just so great. Now that it is on my desk, I will use it on several projects before I put it away!
Jennifer McGuire has a Share Handmade Kindness challenge on her blog and it came at the time where I am about to make a Thank You card to my friend.
I want to make this Thank You card more special - one without the phrase "Thank You" on it. This is what I've made:
She is indeed one of a kind and I can't tell how she can manage everything so well in her life. She has a full time job, two small kids, leads an important role at church and spends time with her girlfriends (including me) and lends a hand to us without us having asked.
I was inspired by Kristina Werner's card here to make my own (speaking of that, I wanted to leave her a comment about her inspiration but I couldn't find the comments section of that blog post. If you happen to know how to do that, please let me know!) I do have the stamp sets that she used, but I love the new Close to My Heart Diamonds are Forever stamp setand thought I could make a card full of diamonds.
I stamped the diamonds with the following colors: Poppy, Sunset, Goldrush, Honeyand Canary. I like these colors! After making this card, I like it so much that I also made a masculine version:
I'm sharing a super quick and simple Christmas card today. Even though I no longer mass produce cards, this will be a good one if you need some inspiration.
Some crafty friends try to avoid patterned paper because of the huge stash at home. They'd like some ideas for making cards using cardstock only. I didn't use any patterned paper on this one but I think it is just as nice. :)
The images come from Miracle of Christmas Holiday, a very cute Christmas stamp set that I knew I "need" it when I first saw it. It has some cute animal images but also some sentiments written in an elegant font. It just has something for everyone. You can see all the images here. The ornament was cut from Artistry cartridge. If I were mass producing this card, I'd load a full sheet of cardstock to my Cricut and ask it to fill the page. I found some gold thread in my stash and use it to tie onto the ornament. We could all use some gold on Christmas cards, right?
My card is entering the following challenges: A Snowflake's promise - Christmas City Crafter- Getting Ready for Christmas Papertake - Anything Goes Retarte - Anything Goes
Now that we are in November, I'd like to share the great promotions offered by Close to My Heart this month.
First up isCheers 2016, which is the Stamp of the Month for November. You can see all the images of this stamp set here. It is a great set with images for you to set goals or resolutions for 2016, or just great images for journaling in general.
The next promotion is Simply Fundamental Scrapbooking. If you haven't tried the Paper Fundamentals, it will be the best time to do it! During this month, if you purchase the Fundamental Scrapbooking workshop bundle, you'll qualify to receive a value pack of side load or top load Memory Protectors for free! That's a savings of $19.95! Wondering what's in the bundle? It includes on Paper Fundamentals Enchantment pack, one Fundamental stickers Enchantment pack, one Peacock Fundamental assortment and three sheets of White Daisy cardstock.
There is a scrapbooking worshop specifically designed to use this bundle and you'll create beautiful layouts quickly and easily. If you want to know more about this promotion, you can find more information here.
I absolutely love the Charming Cascades stamp set from Close to My Heart and have used it many times already. This time, I kick it up a notch and used it to create an embossed background. The results are lovely.
My favorite pattern from the White Pinespaper packet is the one used hereand this card, and I think I'm ready to buy another packet just for this paper! LOL. I have the ornament shape cut from Cricut Artistry, then I stamped the ornament shape from Holly Jollys stamp set in Fern, then put it on a tag. The tag seemed a bit too bare, so I added the twigs from the stamp set in White Pines Cardmaking Workshop on the Go kit. Some twine was threaded through the tag, and it's done.
I have a flip card to share today! It's a Christmas card:
Who doesn't love the WOW factor of a flip card? If you want to make quite a lot of flip cards, no worries, the Artiste cartridge has many flip card designs for you. All you need is to place the paper on the mat, then with a push of a button, the flip card is done. :) This cartridge can help you make a ton of party flavors and 3-D items. When I first got it I was a bit worried that it might not be "my cartridge" because I don't throw parties at home, but I always reach it for the flip card designs. Those designs alone won my heart.
I have left the rest of the card very simple. The flip part is a circle, so I looked for some stamps then I found these perfect ones in Twinkle, the current Stamp of the Month. I cut out a circle to stamp the two star-lined circles, but I fussy cut the smaller one that reads Christmas Love. This way the outer ring of stars can be seen more clearly. The final step was to line the card base with some lovely patterned paper. I chose the one with snowflakes and holly in the White Pines paper packet.
So there you have it. This flip card came together quickly and easily, yet didn't lose its elegance and wow factor. Love it!
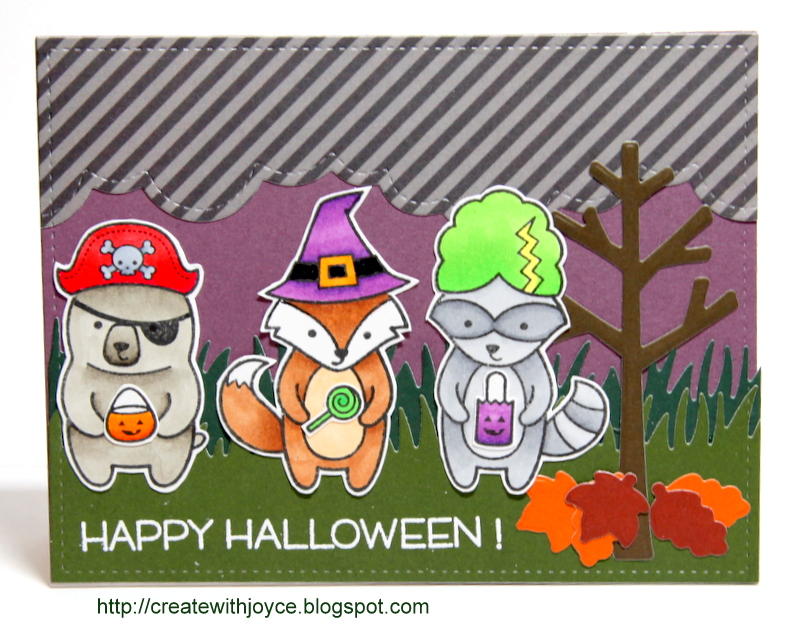
I only make a few Halloween cards each year for kiddos. This year I spent most of my time and energy on this one for my niece. The one I'm sharing today is much simpler:
This card will go to a little boy J that is turning 7 months old. Now you see why I would not spend too much effort on his card. Little boy J is getting really big for his age, so I hope he will like this card.
This is a 4-bar card. I used the stitched rectangle dies from Lawn Fawn to create the background panels. Then I colored the pumpkins and cute smiley ghosts and fussy cut them. The letter b came from Lawn Fawn Louie's abc die set. This is a simple design to incorporate the pumpkins in the word boo and make the ghosts appear as if they come out from the letter b and the pumpkin.
In addition to stamp surgery that I mentioned here, masking is another great way to get more mileage of your stamps.
Let's take a look at this card:
and compare it with this one:
Could you tell which animal appears in both cards? Well, I'm sure you can but I'm hoping that my soon-to-be three year old niece can too! Her birthday is just a few days from Halloween, so I'd like to send her two cards at the same time, and hopefully she will notice the similarity of the animals.
I've used the Lawn Fawn Party Animals stamps and dies for the birthday card but for the halloween card, I used masking to cover up the top part of the animals' heads then stamped their respective hats. When the mask is removed, voila, it looks like the hats and the animals belong to the same stamp. I fussy cut out these Halloween animals with their hats and to be honest, I kept thinking whether I would do the same if I had the dies. Would I just stick the hat on the animal's head, or would I still do masking and fussy cutting?
Dies make cutting small images a lot easier but for such occasion, where I'd like to see if my niece could tell which is which, I would still use masking and fussy cutting. Otherwise it may be too easy for her, right? I can't wait to see her face when she receives these cards!
I've mentioned in this post that I like it so much that there will be a sequel to it, and here it is:
This time there is only one Christmas tree, but this time the tree is decorated with sparkles and bitty sparkles. And what makes it really fun is that it is a circle card! I used one of the patterns from Wishes - one of the Close to My Heart How-to programs where it has a lot of classic yet fun card sketches.
The circle card based and the Christmas tree were cut from Cricut Explore; the former cut with the Art Philosophy cartridge and the latter with Artistry cartridge. I used Cricut Design Space to remove all the patterns shown on a circle card so I had a plain card base to begin with.
I had a lot of fun making these Christmas cards but I really should start preparing Halloween cards for several kiddos.
As for the background, I used Bamboo cardstock and stamped the falling stars from Charming Cascades in Bamboo to add some interest. The trees were added a white enamel star on their top, and I've colored it in yellow using alcohol marker.
I like how quick and easy this card came together. Because I like it so much, I've created another one that's very similar. Stay tuned for that!
I meant to make several Halloween cards this past weekend but that didn't happen. I looked at the Halloween-themed supplies on my desk but they just didn't speak to me. When that happens I normally walk away from my craft desk to clear my mind, then come back to see if the mojo also returns. If that doesn't work out I'll start playing with my supplies without any pressure to complete any project. Fun should be the main focus, right?
It turned out no Halloween cards were made. But I cleaned up my craft desk, rearranged my finished layouts into a D-ring album, and did some organization in my craft area (decided to donate some items that have not been receiving enough attention from me).
I then started to play with my Christmas supplies. Christmas cards remain the type of cards that I make the most and love to make the most. For the very special person I tend to put in a lot of thoughts but more often, I just want to play with my supplies. Sometimes it's testing out a color combo, sometimes it's trying out a new technique. I can't explain why Christmas cards seem to be the best place for me to play. If you find you've made far more Christmas cards than you need, look for places such as senior homes, hospitals or orphanage to send your cards to. Your cards will definitely bring a big smile to people.
So while I was cleaning up, I wanted to see if I could use the stamp in the White Pines Workshop on the Go Scrapbooking kit differently. The stamp says "In the air there is a feeling of Christmas." It's nice and I wanted to use it differently only for fun, there's nothing wrong with that sentiment. So I've cut the sentiment out from the stamp (Ouch!) and replaced it with a sentiment "Happy Holidays" from Holly Jolly Christmas.
No you don't need to do a stamp surgery if you don't want to. You could first stamp it on a piece of post-it sticky note, then cut out the sentiment part and when you stamp it, you'll only have the frame left. You'll then remove the mask and stamp whatever sentiment you like.
Stamp surgery does not involve that "Ouch!" and there was no pain involved. It helps me get a lot more mileage out of my stamps. I was hesitant when I first did it couple of years ago but I never look back. For one, it helps me save quite a bit of post-it sticky notes, and it's less time-consuming than masking. If you plan on mass-producing, the mask will wear out after a few uses and re-creating a mask can be quite annoying. Stamp surgery will save you a lot of time! If you haven't performed stamp surgery on acrylic stamps, try it out. Still not sure? Next time when you de-stash, pick one that you are about to donate and try that one. Did I mention that because of the flexibility these acrylic stamps offer, you could mount the cut pieces back easily and no one will ever know of the stamp surgery (oh except you, and the stamp, because of the "wounds", LOL).
Now that technology is so accessible and convenient, many people's interest in photography, or photography by cell phone has increased. We often see that people snap pictures of many many things, some of which might even seem trivial. In the old days, when digital camera did not exist, I remember my mom brought with her rolls of films when we took family vacation. We did not take pictures randomly, but very selectively. After the trip she would carefully keep the films in her carry on luggage and when we arrived home we went to a well known store to develop them. We normally chose the next-day service rather than the one-hour service, because rumors had it that the one-hour service did not produce photos as high quality as that by next-day service.
It is a totally different era now. When we go on family vacation, my mom no longer brings with her rolls of films. Instead she uses her slim iphone and clicks away. My dad loves his digital camera, and keeps on saying that we no longer need to worry about the films or cost of developing pictures. He too, is a shutterbug. He might even tell me that in my grandparents' era, they had to make a special arrangement to a studio to get any picture taken . Pictures were indeed extremely precious and cherished dearly back in those days.
I am grateful that technology has improved so much that we can enjoy capturing any moments easily. Today, even though pictures are not as special as they were 50 years ago, the special moments are still special and worth documenting.
When it comes to documenting our stories, just like everything else, we all have our own preferences, methods, techniques, likes and dislikes. Do you know what type of memory keeper you are?
Go look at p. 13 - 15 of the new idea book to find out!
Close To My Heart divides memory keepers into four main categories: Pocket scrapbooking, Decorative scrapbooking, Fundamental scrapbooking and Digital Scrapbooking.
In addition to these four, I'd add two more: instalife scrapbooking and event scrapbooking. What are they? Instalife scrapbookers are those who snap pictures with their phones and have tons of pictures on instagram. They print their square pictures and put them in smaller albums like theInstalife Album:
It's a 4x4 album so that's perfect for the instagram pictures! Close to My Heart also has a kit called Colorful Me that help you complete an album easily and quickly:
An event scrapbooker, defined by yours truly, is a scrapbooker that makes a small/mini album after an event, such as a trip, a wedding, a graduation ceremony. When I document an event like this, I like to use the My Creations Kraft 3-Ring Album. An example of this is:
Alternatively if you are not into creating all pages on your own, you may like My Creations Kraft Mini Book. This also comes in black as well. The My Creations Hip Pics Albums is another great choice. See the video below to find out more about it.
Want the album to be smaller? Try the My Creations Mini Folio which has 5 4"x4" panels in accordion fold.
Love many of the options above? Me too!! I document stories differently depending on the occasions. For something very special, I'm a decorative scrapbooker. Otherwise, I may do fundamental scrapbooking. Normally, however, I'm somewhere in between. Oh, sometimes I want to functionally document a story in a short time and that's when I do pocket scrapbooking.
For gifts, my favorite is the Kraft Mini-Albums as shown above. I like that I can make many pages then freely re-arrange them if needed (that tells you how unorganized a scrapbooker I am, shhhh). I also like that it gives me a lot of creative opportunity - it is a blank canvas so I can make it any type of album I want. They are 8x8 which is a good size to keep standard 4x6 pictures but not as intimidating as a 12x12 album. I've made many of these albums as gifts but I never get tired of them. :)
While we are approaching the holiday season, we will be taking a lot of pictures again. If you'd like to preserve your memory, or create a gift that preserves others' memory, I hope the information above will help you. Not sure where to start? Let me show you how. Just leave me a comment below.
Last Saturday was World Card Making Day. I got two cards made - one Christmas and one for a 3 year old boy's birthday. But I managed to finish two mini albums. Yay! One of them was made to document part of the family trip last year; another one was made for my friend's son who is turning six month's old. They are going to be gifts, which are perfect for the approaching holiday season! Guess what, after I'm done making the albums, I keep looking at them and I know when the holiday season arrives, it will be difficult for me to part with them.
Even though I didn't get to keep the albums, I did have lots of fun making them. :) That's why I didn't get much time to make any cards on World Card Making Day. In fact, I've already mailed out the little boy's b-day card without even taking a picture of it. Urgh!
As for the Christmas card, here it is:
It is extremely simple a Christmas card. I like that it is easy and quick to make and if necessary, I could mass produce it within a short time. Don't get me wrong, I love personalized cards. But when it comes to holiday season, things might get too busy (and crazy!) so I'll grab supplies and make cards wherever I go. For instance, if I were to mass produce this card, I will first cut all papers then I'll likely grab one stamp mount on the block, Smoothie ink pad and the stack of cut Smoothie cardstock. I could also bring the smaller stamp mount on a 1" block, Desert Sand ink pad and the prepared Kraft pieces. The main panel, however, will be done at home. The big green ornament was stamped using the rock-and-roll technique - where I first inked it up in Sweet Leaf and rock the edges of the stamp on the new Fern ink pad to create a bit of depth.
When I was looking for inspiration to create this card using the Stamp of the Month in October, I flipped through my Originals - a How to program by Close to My Heart. This sketch always helps me out and this time is no different. Oh, if you click on the link to see how this book looks, you'll see that the card on the book cover was created using the same sketch as my card too! What a coincidence!
Just a quick reminder that today is the last day to get the awesome stamp set Paper Garden, which is the Stamp of the Month in September. You can buy the stamp at its regular price of $17.95 or make qualifying purchase of $50 and get this stamp for $5!
I totally forgot that I've never shared anything made with it and to compensate for that, I'm sharing two cards that used the same stamps but look totally different. First up is this monochromatic one:
I inked up the flower and the sentiment in Goldrush, layered it on Kraft then Chocolate cardstock on a cardbase.
Then I wanted to make it super colorful:
I used the new and fun watercolor paints to create the background, then inked up the flower and sentiment in black. Black silhouette image on colorful background is one of my favorites! In case you are wondering, the sentiment comes from the stamp set called Finding the Words, which is a great set where you can make different combination of words to create your own sentiment!
Today also marks the last day to get the Exclusive Hello, Life! stamp sets. You can buy any of the stamp sets for $13.95 or if you buy all three, it is only $34,95! That's more than 15% discount!
Last December one of the destinations of our family trip was Antelope Canyon. It was a place where even our GPS and navigation system had a difficult time to locate. It was winter time and early in the morning when the sun was still behind the clouds. Cold. Windy. Lost.
We wanted to go there because we learned that a landscape photographer sold a photo taken there at $6.5 million! See the info about this most expensive photo here.
Because it was too early, we didn't get enough sunlight to take good pictures of the passageway of the Canyon. Further, my hands were freezing (even with gloves) and shaking. I couldn't take any decent pictures. We had a hard time capturing the rocks, let alone our faces. When we came out of the passageway, however, the change of lighting and temperature made a world of difference (before the tour, we were told that it was at least 10 degrees lower inside the passageway). We started taking more pictures because our faces became "visible" again. This is one that my mom and I took right outside the passageway. The light was not good (the further we walked away from it the brighter it was) but we couldn't wait to capture it:
I used the Zoe paper pack to make this layout because the Sorbet color matches so well with the rocks of the Canyon. I've also used several images from The Authentic Life stamp set to create a journaling box and accents for my layout. Of course the Zoe Complements is a must, even though I've only used one piece of the die-cuts.
I first worried that a 4x6 picture on a 12x12 layout might get lost and the layout would have too much emptiness. But I think the colors and patterns of the Zoe paper pack have totally eased my concern. The layers and patterns balance with the picture nicely.
One side note: you see in the picture that I was holding a blanket. No, that wasn't for me even though I am perpetually cold. We had the blanket ready for my two-year old niece. Towards the end of the tour she woke up from her nap and started walking on her own and didn't want the blanket anymore.
I'm entering this layout to the challenge at Heart 2 Heart Challenges: Change. It's the change of lighting and temperature that prompted us to take this picture and document this story on a layout. "Change" can be broadly defined, go see other inspiring work by the talented Heart 2 Heart design team!
Oh Boy! It has been a week since I last posted. Sorry about the silence here.
I do have another one-page layout using the cute Zoe paper to share today.
This picture shows the four of us sharing a small order of Calamari at Fisherman's Wharf in San Francisco earlier this year. I couldn't take a better picture after my hands became greasy (and slippery too!) The four of us meant to have lunch at Fisherman's Wharf but guess what? We each had a different meaning of "having lunch at Fisherman's Wharf" in mind. Eventually we had soup and sandwiches for lunch but we grabbed some snacks while strolling down Fisherman's Wharf.
I've mentioned countless times that I love Workshops on the Go offered by Close to My Heart, whether it is the scrapbooking kits or the cardmaking kits. I am the type of person who likes to spread out my supplies then choose from the pile when I create, so even though I enjoy the camaraderie at a crop, I often wonder how I can carry my whole craft area with me to a crop. I used to spend a lot of time packing, then unpacking, and re-packing because I worried that I had forgotten something. The time I spent on packing was no less than the time I spent at my friend's place.
Workshops on the Go kits make it much easier. I just have to grab the kit, a few ink pads, theZoe Complements and I'm all set to create layouts and cards while I am at a crop or my friend's place. If you tend to go to crops a lot, I'd suggest that you try this out! It will lighten your load by a lot and the time that would be otherwise spent on packing can be spent on creating!
Earlier this year, I took an online class taught by Kelly Purkey at Studio Calico. In the class, Kelly shared her awesome sketches and the contributors shared their take of those sketches. It was a wide opening experience to see how expert crafters interpret the sketch and use it on traditional scrapbooking, cards and pocket scrapbooking. Don't get me wrong. I love the patterns in our How-To programs, and I continue to consult with them whenever I have a creative rut. For me, I really enjoyed to see how others understand and interpret a sketch and make it their own.
Back to my layout here. I've used one of the sketches learned from the online class. Unfortunately, I pretty much followed the sketch closely without much personal interpretation. :P I first used Slate Ink and the smaller stamps in theZoe Workshop on the Goto create a tone-on-tone effect on the background. Then I put on a large piece of the Sweet Leaf patterned paper in the middle as the focus. I added a Sorbet pattern strip and photo mat behind the picture, and someZoe complements around it. Below the picture are a few Cricut cut outs from Artbooking cartridge. I cut out the title using the Artiste cartridge and finished it with my journaling. I noticed that the vellum complements might not stand out enough so I added some white cardstock to make it pop more. I like this sketch and I'm hoping to add more personal touch to it and make it my own!
The more I am playing with the Zoe paper pack, the more I am in love with it! I dug up some older photos and made a layout with it:
It is a pattern from Magic, a how-to program from Close to My Heart. I have always liked this pattern. That it is tilted at an angle adds quite a bit of fun. Early this year my mom and I visited Napa. We visited a few wineries, did some shopping and enjoyed good food. This picture was taken at Whole Foods and we couldn't resist trying out this gigantic spinner wheel.
I like that this pattern involves a circle, which coordinates with the spinner wheel in the picture. I've used the zip strip of one of the patterned paper. Did you see the vertical strip with months and days listed? I've used two small triangles to indicate the date this picture was taken.
A really fun part when I was making this layout was to include the *new* watercolor paints. I felt that the top right and bottom right corners were a bit bare so I added some white splat to those areas. I added water to the well that contains white paint, then loaded up my brush with white paint, then just tabbed the brush end to let the paint drop in those areas. Oh I used a smaller brush so the drops are smaller. And I had covered up the picture before I did that. I didn't like the paint to fall on the picture, but you may like it that way! This is a technique that we have limited control. That's ok. Let go of your usual self and let the paint drops fall on where they wish. The results will be different every time. That makes it fun, doesn't it?
This picture brings back all the fond memories. At this moment, however, Napa county and Sonoma county are few of the most affected communities due to the massive fire. My prayers go to the residents there.
I have been having a lot of fun playing with the Close to my Heart Zoe paper. Love the colors and the patterns! They are easy to work with and very versatile. Because of that I have been making layouts with it non-stop. Thus far I have made 5-single page layouts and I'll be sharing them here on my blog and pinterest. Stay tuned!
Today I am sharing a card that didn't make use of the Zoe paper. Instead, I was inspired by the color scheme of it. It's a birthday card for my dad:
I've used Pear cardstock as the background, then used the stamp from the Zoe Workshop on the Goto fill the background. Tone on tone is one of my favorite stamping techniques! It adds interest but doesn't make it too busy.
The sentiment was one that I designed on Cricut Design Space using the Cricut Artfully Sent fonts. I first created an open circle, then lined up each letter to the circumference of it. It was quite a bit of work but I totally love it! Further, the designed shape can be scaled up or down and used for many many cards! I cut it first in Slate cardstock then three more times in White Daisy cardstock. The cut outs are stacked to create some three dimensional effect.
"Dad" was created similarly, except it is a lot easier. The font used was from Cricut Artbooking. I like to weld the letters - it's much simpler to stick one word then one letter at a time. This time I have two "Dads" stacked up. I like that it is not on the same level as Happy Birthday.
Another source of inspiration was from Freshly Made Sketches. I've used its sketch as a starting point:
Happy Monday everyone! Hope my US friends are enjoying their long weekend. I sure do enjoy this extra day that gives me extra time to play at my craft desk. :)
It has been ages since I played along any challenges. Since it is Monday, I'm playing with Mojo Monday Challenge. I have already made many layouts with the Close to My Heart Zoe paper, but I still have quite a bit of scraps left. The scraps, together with the new For Family stamp set, are just perfect to create this card:
September is National Stamping Month and whether you are a traditional scrapbooker, pocket scrapbooker or cardmaker, we have something to help you say "hello" to life. There are three exclusive C-size stamp sets that are only available this month. Get each of them fo $13.95 or all of them for $34.95 - a savings of $6.90!
These exclusive stamp sets coordinate with the new Artistry cartridge. That will help you expand your artwork options even further. :)
Finally, I must tell you that the September Stamp of the Month is absolutely gorgeous. I love silhouette images because they are oh so elegant. Further, they are great for techniques!
Start browsing the new catalogs here and indulge yourself in the eye candy!
Among many of them, the Blossom paper packet is my favorite. I've made countless projects with it, including this mini album from yesterday's post.
Jackson paper packet, on the other hand, is truly special to me. Earlier this summer I made this layout to enter the layout contest in the Close to My Heart Convention (this picture was taken before I added the flip flaps):
It's my first Convention and I won the top ten! So very excited! I attribute my accomplishment to the great products. I used the Jackson Workshop on the Go Scrapbooking kit, the Complements and the Assortments and the Picture My Life cards for my layout. This series of products is perfectly coordinating for the pictures of my family vacation at Horseshoe Bend. The great products did most of the work for me. I love them!
We are all excited about the new Annual Inspirations that will go live tomorrow. But if you are on the fence for these products, you gotta act fast. After today they won't be available anymore.
Speaking of retiring products, I will miss some Enchantment colors dearly. As mentioned here, I love Oliveand Outdoor Denim. They are the perfect green and dark blue for masculine projects. Together with these, Barn Red, Smokey Plum, Ponderosa Pine, Autumn Terracota, Indian Corn Blue will also retire. If you like any of these colors or if you have any unfinished projects involving these colors, be sure to grab the ink pad and cardstock before they are gone!
Today also marks the last day to qualify for the Get Organized special.
Remember you'll get a Free stamp set Balloon Wishes for free if you buy the Marker Roll-up and you'll get the new Bling and Base sheets for free if you buy the Accessory Roll-up. There's no limit as to the number of the free items, so the more you buy the more free items you'll get!