I absolutely love the Charming Cascades stamp set from Close to My Heart and have used it many times already. This time, I kick it up a notch and used it to create an embossed background. The results are lovely.
My favorite pattern from the White Pinespaper packet is the one used hereand this card, and I think I'm ready to buy another packet just for this paper! LOL. I have the ornament shape cut from Cricut Artistry, then I stamped the ornament shape from Holly Jollys stamp set in Fern, then put it on a tag. The tag seemed a bit too bare, so I added the twigs from the stamp set in White Pines Cardmaking Workshop on the Go kit. Some twine was threaded through the tag, and it's done.
I have a flip card to share today! It's a Christmas card:
Who doesn't love the WOW factor of a flip card? If you want to make quite a lot of flip cards, no worries, the Artiste cartridge has many flip card designs for you. All you need is to place the paper on the mat, then with a push of a button, the flip card is done. :) This cartridge can help you make a ton of party flavors and 3-D items. When I first got it I was a bit worried that it might not be "my cartridge" because I don't throw parties at home, but I always reach it for the flip card designs. Those designs alone won my heart.
I have left the rest of the card very simple. The flip part is a circle, so I looked for some stamps then I found these perfect ones in Twinkle, the current Stamp of the Month. I cut out a circle to stamp the two star-lined circles, but I fussy cut the smaller one that reads Christmas Love. This way the outer ring of stars can be seen more clearly. The final step was to line the card base with some lovely patterned paper. I chose the one with snowflakes and holly in the White Pines paper packet.
So there you have it. This flip card came together quickly and easily, yet didn't lose its elegance and wow factor. Love it!
I only make a few Halloween cards each year for kiddos. This year I spent most of my time and energy on this one for my niece. The one I'm sharing today is much simpler:
This card will go to a little boy J that is turning 7 months old. Now you see why I would not spend too much effort on his card. Little boy J is getting really big for his age, so I hope he will like this card.
This is a 4-bar card. I used the stitched rectangle dies from Lawn Fawn to create the background panels. Then I colored the pumpkins and cute smiley ghosts and fussy cut them. The letter b came from Lawn Fawn Louie's abc die set. This is a simple design to incorporate the pumpkins in the word boo and make the ghosts appear as if they come out from the letter b and the pumpkin.
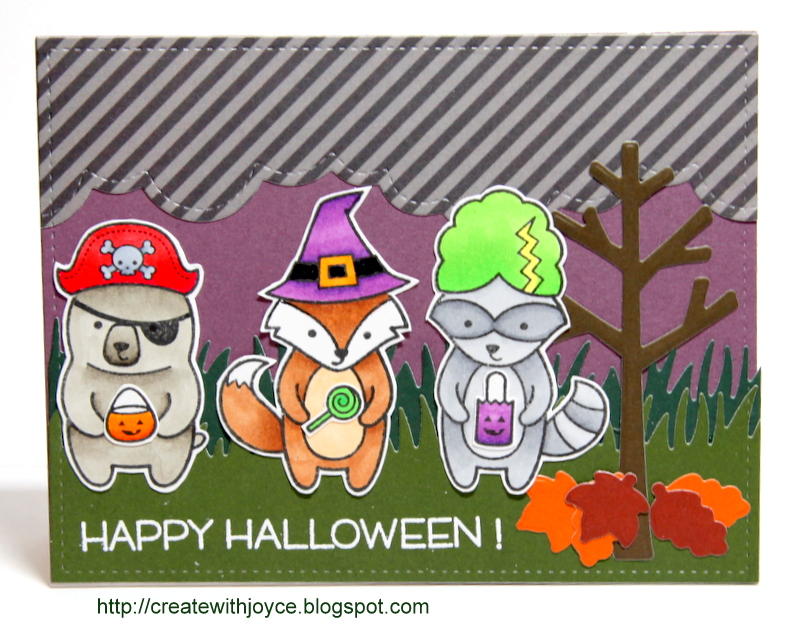
In addition to stamp surgery that I mentioned here, masking is another great way to get more mileage of your stamps.
Let's take a look at this card:
and compare it with this one:
Could you tell which animal appears in both cards? Well, I'm sure you can but I'm hoping that my soon-to-be three year old niece can too! Her birthday is just a few days from Halloween, so I'd like to send her two cards at the same time, and hopefully she will notice the similarity of the animals.
I've used the Lawn Fawn Party Animals stamps and dies for the birthday card but for the halloween card, I used masking to cover up the top part of the animals' heads then stamped their respective hats. When the mask is removed, voila, it looks like the hats and the animals belong to the same stamp. I fussy cut out these Halloween animals with their hats and to be honest, I kept thinking whether I would do the same if I had the dies. Would I just stick the hat on the animal's head, or would I still do masking and fussy cutting?
Dies make cutting small images a lot easier but for such occasion, where I'd like to see if my niece could tell which is which, I would still use masking and fussy cutting. Otherwise it may be too easy for her, right? I can't wait to see her face when she receives these cards!
I've mentioned in this post that I like it so much that there will be a sequel to it, and here it is:
This time there is only one Christmas tree, but this time the tree is decorated with sparkles and bitty sparkles. And what makes it really fun is that it is a circle card! I used one of the patterns from Wishes - one of the Close to My Heart How-to programs where it has a lot of classic yet fun card sketches.
The circle card based and the Christmas tree were cut from Cricut Explore; the former cut with the Art Philosophy cartridge and the latter with Artistry cartridge. I used Cricut Design Space to remove all the patterns shown on a circle card so I had a plain card base to begin with.
I had a lot of fun making these Christmas cards but I really should start preparing Halloween cards for several kiddos.
As for the background, I used Bamboo cardstock and stamped the falling stars from Charming Cascades in Bamboo to add some interest. The trees were added a white enamel star on their top, and I've colored it in yellow using alcohol marker.
I like how quick and easy this card came together. Because I like it so much, I've created another one that's very similar. Stay tuned for that!
I meant to make several Halloween cards this past weekend but that didn't happen. I looked at the Halloween-themed supplies on my desk but they just didn't speak to me. When that happens I normally walk away from my craft desk to clear my mind, then come back to see if the mojo also returns. If that doesn't work out I'll start playing with my supplies without any pressure to complete any project. Fun should be the main focus, right?
It turned out no Halloween cards were made. But I cleaned up my craft desk, rearranged my finished layouts into a D-ring album, and did some organization in my craft area (decided to donate some items that have not been receiving enough attention from me).
I then started to play with my Christmas supplies. Christmas cards remain the type of cards that I make the most and love to make the most. For the very special person I tend to put in a lot of thoughts but more often, I just want to play with my supplies. Sometimes it's testing out a color combo, sometimes it's trying out a new technique. I can't explain why Christmas cards seem to be the best place for me to play. If you find you've made far more Christmas cards than you need, look for places such as senior homes, hospitals or orphanage to send your cards to. Your cards will definitely bring a big smile to people.
So while I was cleaning up, I wanted to see if I could use the stamp in the White Pines Workshop on the Go Scrapbooking kit differently. The stamp says "In the air there is a feeling of Christmas." It's nice and I wanted to use it differently only for fun, there's nothing wrong with that sentiment. So I've cut the sentiment out from the stamp (Ouch!) and replaced it with a sentiment "Happy Holidays" from Holly Jolly Christmas.
No you don't need to do a stamp surgery if you don't want to. You could first stamp it on a piece of post-it sticky note, then cut out the sentiment part and when you stamp it, you'll only have the frame left. You'll then remove the mask and stamp whatever sentiment you like.
Stamp surgery does not involve that "Ouch!" and there was no pain involved. It helps me get a lot more mileage out of my stamps. I was hesitant when I first did it couple of years ago but I never look back. For one, it helps me save quite a bit of post-it sticky notes, and it's less time-consuming than masking. If you plan on mass-producing, the mask will wear out after a few uses and re-creating a mask can be quite annoying. Stamp surgery will save you a lot of time! If you haven't performed stamp surgery on acrylic stamps, try it out. Still not sure? Next time when you de-stash, pick one that you are about to donate and try that one. Did I mention that because of the flexibility these acrylic stamps offer, you could mount the cut pieces back easily and no one will ever know of the stamp surgery (oh except you, and the stamp, because of the "wounds", LOL).
Now that technology is so accessible and convenient, many people's interest in photography, or photography by cell phone has increased. We often see that people snap pictures of many many things, some of which might even seem trivial. In the old days, when digital camera did not exist, I remember my mom brought with her rolls of films when we took family vacation. We did not take pictures randomly, but very selectively. After the trip she would carefully keep the films in her carry on luggage and when we arrived home we went to a well known store to develop them. We normally chose the next-day service rather than the one-hour service, because rumors had it that the one-hour service did not produce photos as high quality as that by next-day service.
It is a totally different era now. When we go on family vacation, my mom no longer brings with her rolls of films. Instead she uses her slim iphone and clicks away. My dad loves his digital camera, and keeps on saying that we no longer need to worry about the films or cost of developing pictures. He too, is a shutterbug. He might even tell me that in my grandparents' era, they had to make a special arrangement to a studio to get any picture taken . Pictures were indeed extremely precious and cherished dearly back in those days.
I am grateful that technology has improved so much that we can enjoy capturing any moments easily. Today, even though pictures are not as special as they were 50 years ago, the special moments are still special and worth documenting.
When it comes to documenting our stories, just like everything else, we all have our own preferences, methods, techniques, likes and dislikes. Do you know what type of memory keeper you are?
Go look at p. 13 - 15 of the new idea book to find out!
Close To My Heart divides memory keepers into four main categories: Pocket scrapbooking, Decorative scrapbooking, Fundamental scrapbooking and Digital Scrapbooking.
In addition to these four, I'd add two more: instalife scrapbooking and event scrapbooking. What are they? Instalife scrapbookers are those who snap pictures with their phones and have tons of pictures on instagram. They print their square pictures and put them in smaller albums like theInstalife Album:
It's a 4x4 album so that's perfect for the instagram pictures! Close to My Heart also has a kit called Colorful Me that help you complete an album easily and quickly:
An event scrapbooker, defined by yours truly, is a scrapbooker that makes a small/mini album after an event, such as a trip, a wedding, a graduation ceremony. When I document an event like this, I like to use the My Creations Kraft 3-Ring Album. An example of this is:
Alternatively if you are not into creating all pages on your own, you may like My Creations Kraft Mini Book. This also comes in black as well. The My Creations Hip Pics Albums is another great choice. See the video below to find out more about it.
Want the album to be smaller? Try the My Creations Mini Folio which has 5 4"x4" panels in accordion fold.
Love many of the options above? Me too!! I document stories differently depending on the occasions. For something very special, I'm a decorative scrapbooker. Otherwise, I may do fundamental scrapbooking. Normally, however, I'm somewhere in between. Oh, sometimes I want to functionally document a story in a short time and that's when I do pocket scrapbooking.
For gifts, my favorite is the Kraft Mini-Albums as shown above. I like that I can make many pages then freely re-arrange them if needed (that tells you how unorganized a scrapbooker I am, shhhh). I also like that it gives me a lot of creative opportunity - it is a blank canvas so I can make it any type of album I want. They are 8x8 which is a good size to keep standard 4x6 pictures but not as intimidating as a 12x12 album. I've made many of these albums as gifts but I never get tired of them. :)
While we are approaching the holiday season, we will be taking a lot of pictures again. If you'd like to preserve your memory, or create a gift that preserves others' memory, I hope the information above will help you. Not sure where to start? Let me show you how. Just leave me a comment below.
Last Saturday was World Card Making Day. I got two cards made - one Christmas and one for a 3 year old boy's birthday. But I managed to finish two mini albums. Yay! One of them was made to document part of the family trip last year; another one was made for my friend's son who is turning six month's old. They are going to be gifts, which are perfect for the approaching holiday season! Guess what, after I'm done making the albums, I keep looking at them and I know when the holiday season arrives, it will be difficult for me to part with them.
Even though I didn't get to keep the albums, I did have lots of fun making them. :) That's why I didn't get much time to make any cards on World Card Making Day. In fact, I've already mailed out the little boy's b-day card without even taking a picture of it. Urgh!
As for the Christmas card, here it is:
It is extremely simple a Christmas card. I like that it is easy and quick to make and if necessary, I could mass produce it within a short time. Don't get me wrong, I love personalized cards. But when it comes to holiday season, things might get too busy (and crazy!) so I'll grab supplies and make cards wherever I go. For instance, if I were to mass produce this card, I will first cut all papers then I'll likely grab one stamp mount on the block, Smoothie ink pad and the stack of cut Smoothie cardstock. I could also bring the smaller stamp mount on a 1" block, Desert Sand ink pad and the prepared Kraft pieces. The main panel, however, will be done at home. The big green ornament was stamped using the rock-and-roll technique - where I first inked it up in Sweet Leaf and rock the edges of the stamp on the new Fern ink pad to create a bit of depth.
When I was looking for inspiration to create this card using the Stamp of the Month in October, I flipped through my Originals - a How to program by Close to My Heart. This sketch always helps me out and this time is no different. Oh, if you click on the link to see how this book looks, you'll see that the card on the book cover was created using the same sketch as my card too! What a coincidence!