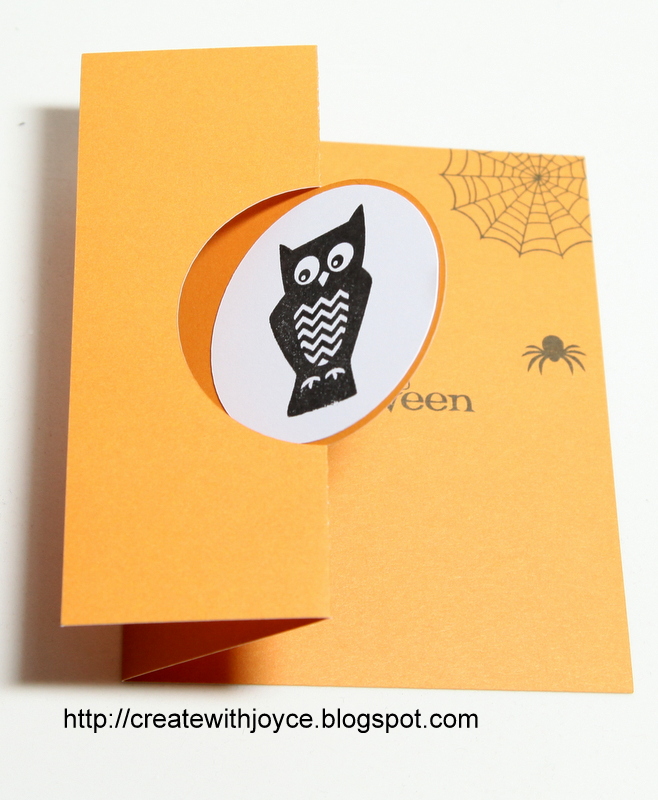
Is it bad that I'm copying myself? I had this in mind when I was creating the first one, so is it really copying?
Last week, I shared the sister card:
I knew that this sketch and the stamp images could be used for a variety of occasions when I made the birthday card. So I attempted to make a Love You card and just as I anticipated, it worked out great! Next time I'm going to try a Thank You card. Is it too much? They go to different recipients, so I guess that's okay.
Sometimes when I find a sketch or combination of elements that I like, I'll use it on many cards. The interesting thing is that, although they look similar, it is still fun to make them. By switching up a few elements the cards look similar yet different. :)
My card is entering the following:
Inspiration Destination - Anything Goes
Color Crazy Craft Challenge - Anything Goes
Creative Moments - Anything Goes
Crafty Gals Corner - Add a heart
Moo-Mania - love
Thanks for stopping by!
Showing posts with label Techniques. Show all posts
Friday, January 20, 2017
Sunday, January 15, 2017
Love you
I'm sharing a card where no stamping was involved. I'm a stamper at heart and most of my cards involve some stamping. Stamping is also one of the easiest things to do when you crop with your friends - no need to haul a cutting machine!
My card is very simple. When I made it, I wanted to use several paper pads and perhaps I got carried away by it and didn't do stamping.
It is a window card so I used different heart dies from Lawn Fawn to create a border for the opening. The paper used comes from four paper pads (Weather Sweater, Let's Polka, Beachside, Perfectly Plaid Fall)! I love mixing and matching stamps and now I also love mixing and matching paper!
Thanks for stopping by!
My card is very simple. When I made it, I wanted to use several paper pads and perhaps I got carried away by it and didn't do stamping.
It is a window card so I used different heart dies from Lawn Fawn to create a border for the opening. The paper used comes from four paper pads (Weather Sweater, Let's Polka, Beachside, Perfectly Plaid Fall)! I love mixing and matching stamps and now I also love mixing and matching paper!
Thanks for stopping by!
Sunday, December 25, 2016
Merry Christmas
Merry Christmas everyone!
Hope you enjoy peace, love and joy of this magical season.
I want to prepare a quick post to share my favorite Christmas card of the year. At first I only wanted to create a card quickly as I was running out of time, but I ended up really like it and made a few more. This card came together in no time at all!
Yes it's a photo card, my very first photo card ever!
I printed the picture at 4x6, then trimmed off 3/4 inch off the very bottom of it to fit a regular note card.
I put a piece vellum on top of the picture, where a sentiment was heat embossed in gold. And that's it, it's done in seconds!
I really like that I could use a 1/8" strip of score tape to adhere to vellum to the top of the card front. Isn't it always a challenge to adhere vellum? In this case, the frame of the card base is the perfect place for the adhesive to sit on. Yay!
Early this month, I took Meo (the cat) to Petsmart where we could take pictures with Santa. It has been a long time since I last took a picture with Santa (perhaps since I was a kid??) and this time Meo is also in the picture, making it very special for me. I just really love it. Sending a special picture to my loved ones is making me happy too! :)
Now that I know picture cards take no time to make, I suspect this will be what I send to friends and family in the future. hahahahaha~
Merry Christmas!
Hope you enjoy peace, love and joy of this magical season.
I want to prepare a quick post to share my favorite Christmas card of the year. At first I only wanted to create a card quickly as I was running out of time, but I ended up really like it and made a few more. This card came together in no time at all!
Yes it's a photo card, my very first photo card ever!
I printed the picture at 4x6, then trimmed off 3/4 inch off the very bottom of it to fit a regular note card.
I put a piece vellum on top of the picture, where a sentiment was heat embossed in gold. And that's it, it's done in seconds!
I really like that I could use a 1/8" strip of score tape to adhere to vellum to the top of the card front. Isn't it always a challenge to adhere vellum? In this case, the frame of the card base is the perfect place for the adhesive to sit on. Yay!
Early this month, I took Meo (the cat) to Petsmart where we could take pictures with Santa. It has been a long time since I last took a picture with Santa (perhaps since I was a kid??) and this time Meo is also in the picture, making it very special for me. I just really love it. Sending a special picture to my loved ones is making me happy too! :)
Now that I know picture cards take no time to make, I suspect this will be what I send to friends and family in the future. hahahahaha~
Merry Christmas!
Friday, December 23, 2016
Happy Holidays
Happy Friday!
Are you all ready for Christmas? I am so not ready but I am so looking forward to the most magical season of the year. Things will fall into place, I keep telling myself.
I'm sharing another Christmas card using Lawn Fawn goodies, of course!
I wasn't too confident with this card, but the more I look at it, the more I like it. I've heightened the tree image by stamping the bottom portion of it. Love this technique to add value to the stamps. I've mixed and matched images from different sets, of course. The cutest part is that the bunny is about to put a heart on the tree. Oh so sweet.
I'm entering this card to the following challenges:
Brown Sugar Challenge - Christmas
Jingle Belles - Christmas
Crafty Creations - Any Holidays
Holly Jolly Christmas - Christmas card
Thanks for stopping by and Happy Holidays!
Are you all ready for Christmas? I am so not ready but I am so looking forward to the most magical season of the year. Things will fall into place, I keep telling myself.
I'm sharing another Christmas card using Lawn Fawn goodies, of course!
I wasn't too confident with this card, but the more I look at it, the more I like it. I've heightened the tree image by stamping the bottom portion of it. Love this technique to add value to the stamps. I've mixed and matched images from different sets, of course. The cutest part is that the bunny is about to put a heart on the tree. Oh so sweet.
I'm entering this card to the following challenges:
Brown Sugar Challenge - Christmas
Jingle Belles - Christmas
Crafty Creations - Any Holidays
Holly Jolly Christmas - Christmas card
Thanks for stopping by and Happy Holidays!
Friday, December 16, 2016
Happy Howlidays
I have said it many times that masculine cards could be tricky. That still holds true. But I think that many Lawn Fawn critter images will bring a smile to everyone's face.
I've made this card for a guy friend who loves dogs.
Remember I said the slide on over die is my new favorite? I just have to use it on every card now. Love interactive cards:
You may find this card look familiar. It has the exact same layout as this one here. The cards go to different household. Hopefully they won't know about it. Shhhh......
I'm entering my card to the following:
The Male Room - Christmas
Craftaholics - Guys + Christmas
Crafting with an Attitude - Anything Goes
Through the Purple Haze - Anything Goes
Crafty Gals Corner - Anything Goes
Thanks for stopping by!
Monday, October 17, 2016
Z fold card/Swing open card
I'm continuing to make Halloween cards for my friend's kids. Even though Wild card at Online Card Classes is over, the urge to make a fun/interactive card stays with me.
I realized that I'm quite behind on making all the Halloween cards so I summoned the help of my trusty helper - Cricut! :)
I flipped through the images and decided to create something simple. This card came together at no time at all:
When the card is closed:
That's easy peasy. I used the Artiste cartridge to create the card base, and also the two circles for the stamped images to go on the flip part. The circle covers up the sentiment "Happy Halloween and the bat, but the web and spider are peeking out.
Love that it's fun and easy to make! :)
The card is entering to
Bitten by the Bug 2 - Halloween
Get Creative - Black and Orange
Crafty Boots - Halloween
Stamps & Fun - Halloween
The Paper Girls - Halloween
Thanks for stopping by!
I realized that I'm quite behind on making all the Halloween cards so I summoned the help of my trusty helper - Cricut! :)
I flipped through the images and decided to create something simple. This card came together at no time at all:
When the card is closed:
That's easy peasy. I used the Artiste cartridge to create the card base, and also the two circles for the stamped images to go on the flip part. The circle covers up the sentiment "Happy Halloween and the bat, but the web and spider are peeking out.
Love that it's fun and easy to make! :)
The card is entering to
Bitten by the Bug 2 - Halloween
Get Creative - Black and Orange
Crafty Boots - Halloween
Stamps & Fun - Halloween
The Paper Girls - Halloween
Thanks for stopping by!
Thursday, October 13, 2016
Pop up card
It's time to make Halloween cards for my lovely niece and nephew!
Although I make far fewer cards than before, I continue to purchase a lot of cute products in anticipation of making cards for them.
What's more fun than making an interactive Halloween card?
The card front is very simple but once you open it up:
The twist and pop mechanism makes it a surprise! I had fun coloring the critters in various costumes and putting it together. I have certainly had opened the card for 100+ times to see the fun but I never cease to smile once I see it. :)
I'm entering my card to:
Animal Friends - Autumn/Halloween
Crafty Awesomeness - coloring
Stampotique - Halloween
Unicorn - Halloween
Thanks for stopping by!
Although I make far fewer cards than before, I continue to purchase a lot of cute products in anticipation of making cards for them.
What's more fun than making an interactive Halloween card?
The card front is very simple but once you open it up:
The twist and pop mechanism makes it a surprise! I had fun coloring the critters in various costumes and putting it together. I have certainly had opened the card for 100+ times to see the fun but I never cease to smile once I see it. :)
I'm entering my card to:
Animal Friends - Autumn/Halloween
Crafty Awesomeness - coloring
Stampotique - Halloween
Unicorn - Halloween
Thanks for stopping by!
Wednesday, October 12, 2016
A shaker card
I'm continuing to share another assignment I made for the Wild Cards class at Online Card Classes.
It's a shaker card today.
And if you shake it up the glitter would go to the top of the snow globe:
Cute and super fun to make!
But let me share a story behind it - I was actually hoping to put water in it to make it look more realistic as a snow globe. I went to several stores to buy the materials and made it successfully. I set it aside while working on other "homework" from the class, then when I went back to this card to take pictures of it. Some images are smearing. Eek! I can't explain if I've put in too much water, or the zip lock was not closed securely, or the zip lock was made of low quality materials that it would leak. But at that time I couldn't care less! I just want to salvage it to the extent possible!
I was able to save the top part of the card (everything above the acetate sheet) so I re-created the scene. I was disappointed but I didn't let it kill the joy of making a fun card. I completed it without filling it with water. It's still cute, isn't it?
My card is linking up to:
Craftyhazelnut's Christmas challenge - patterned paper
Sparkles Christmas - Snowman
12 months of Christmas - Anything Goes
Thanks for stopping by!
It's a shaker card today.
And if you shake it up the glitter would go to the top of the snow globe:
Cute and super fun to make!
But let me share a story behind it - I was actually hoping to put water in it to make it look more realistic as a snow globe. I went to several stores to buy the materials and made it successfully. I set it aside while working on other "homework" from the class, then when I went back to this card to take pictures of it. Some images are smearing. Eek! I can't explain if I've put in too much water, or the zip lock was not closed securely, or the zip lock was made of low quality materials that it would leak. But at that time I couldn't care less! I just want to salvage it to the extent possible!
I was able to save the top part of the card (everything above the acetate sheet) so I re-created the scene. I was disappointed but I didn't let it kill the joy of making a fun card. I completed it without filling it with water. It's still cute, isn't it?
My card is linking up to:
Craftyhazelnut's Christmas challenge - patterned paper
Sparkles Christmas - Snowman
12 months of Christmas - Anything Goes
Thanks for stopping by!
Tuesday, October 11, 2016
Four identical cards?
Can you tell the difference among the following four pictures?
Thanks for stopping by!
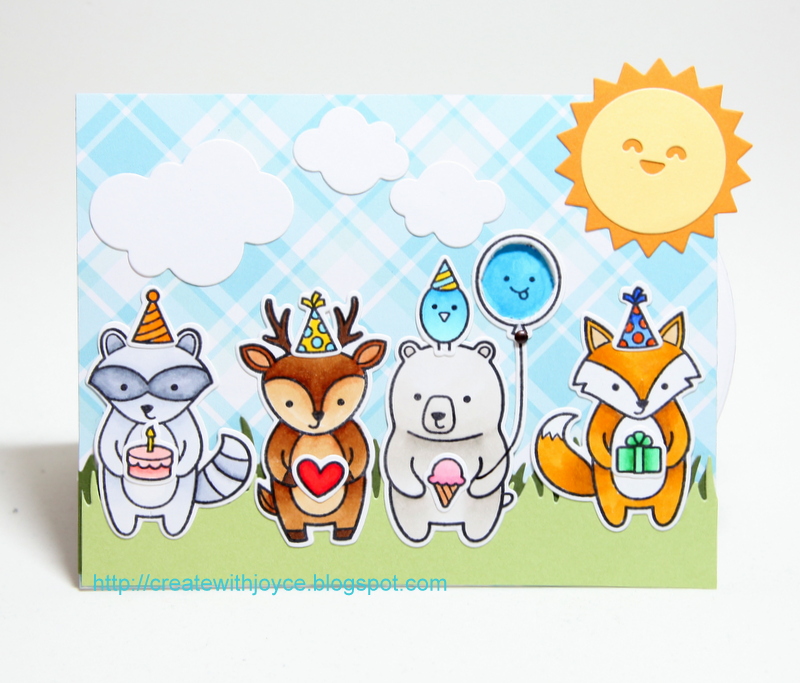
Using the techniques I learned at Wild Card over at Online Card Classes, I have made this spinner card. The interesting part is the balloon held by the bear. As you turn the spinner, the color changes and so does the face, except for the orange balloon I've stamped 4. Yes, my niece is turning 4 and I have no idea how she is growing so fast!
Last year I made a birthday card for her using the same stamp set, but there only 3 critters. This year there are 4 critters and the card involves an interactive portion. I sure did have a lot of fun making it and I hope she will have fun playing it.
I'm linking my card to:
Crafty Hazelnut - patterned paper
Happy Little Stampers - dies
Scrap-Creations - Birthday
Die Cutting Divas - Dessert
Thanks for stopping by!
Monday, June 6, 2016
Magical
My dry eye symptoms persist so I have to refrain from using the computer. Argh!
But because I have to do warm compress constantly over the weekend, I stayed in most of the time. That means quite a bit of crafting done. I was still working on the birthday cards my mom "ordered". Then I also did some organization. Funny I was giving many items "one last chance" before I send them to donation. But after I have played with it, I had a change of heart. Do I really want to toss it? I asked myself. Then I put that item back in my usual organization rather than the box which will go to donation. I learned this weekend that I need to stay strong. Once I have decided to part with it, I should never look back. Why did I go back to that donation box??
As I was making cards for my mom, I had a little detour and made a quick and easy layout, using the new Magical paper from Close to My Heart.
I have been asked many times how I adopt or adapt a paper pack that seems to have a strong theme for my own use. I don't think I have a knack for it but I can definitely share what i do.
I almost always start a layout with my pictures. This way, I can ensure that I'm focusing on my pictures. Then I choose my papers. That's right, I choose the papers that fit my pictures. At this point you may be wondering why I chose the Disney-themed paper for my pictures.
For the pictures above, for instance, I notice that my nephew J was in a baby blue bib and I was wearing dark colors. The background of the picture is my brother's house and it was bright and white because it was in the morning. It also showed a bit of his fancy kitchen.
In the selection process, I knew I wanted to have some blue in the background. Blue was actually my "must have" because I wanted baby J to be the focus. I knew that Magical has some blue so I took a look at it. There is a sheet of blue patterned paper, which is actually the back of the black paper I used above, showcasing a repeating pattern of tickets. I wanted to use that as a mat for my photos, but the patterns are quite too big to be shown as a border so that idea was aborted.
There is a white patterned paper with very small gray triangles repeating throughout the sheet. That is a perfect paper for photo mats - it has subtle patterns that bring interest but not too distracting; AND the patterns are small enough to be recognized. I brought that paper close to my photos and bingo!
Now that I've decided on the mats, I would love to use colors and patterns that show a contrast. The black patterned paper with camera motives was perfect. It's black background against the white-matted photos. That's the biggest contrast I can get in the world, right?
The next decision I made was to bring in blue to the page. At this point, I only have black and white! So I used a sheet of blue cardstock as the base of the page. I wanted to use the "Love this" 6*4 card as my title, so I naturally used two strips of red patterned paper to envelope the black background.
Throughout the whole process, I didn't do anything to "De-Disney" the paper. I focused on the pictures and find the right paper with the right pattern and colors to serve the purpose I wanted. And I must say, although the colors of Magical may suggest a lot of Disney, the patterns like ticket motif, cameras, triangles are very neutral. They are not Disney-bound. Some crafty friends turn away from Magical because they say they didn't have any Disney photos. But who says Magical is only good for a Disney trip?
So that's my paper selection process. I always focus on my pictures and try to use the papers that share common elements with my pictures. Did I mention that the sketch comes from Reflections, a great How-to book for scrapbooking? It helped a lot during the process! I knew from the beginning how many sheets I needed so I wouldn't have to search for more than necessary. :)
When we adopt the paper for our own use, we are making it more versatile and maximizing it. How nice!
Thanks for stopping by!
But because I have to do warm compress constantly over the weekend, I stayed in most of the time. That means quite a bit of crafting done. I was still working on the birthday cards my mom "ordered". Then I also did some organization. Funny I was giving many items "one last chance" before I send them to donation. But after I have played with it, I had a change of heart. Do I really want to toss it? I asked myself. Then I put that item back in my usual organization rather than the box which will go to donation. I learned this weekend that I need to stay strong. Once I have decided to part with it, I should never look back. Why did I go back to that donation box??
As I was making cards for my mom, I had a little detour and made a quick and easy layout, using the new Magical paper from Close to My Heart.
I have been asked many times how I adopt or adapt a paper pack that seems to have a strong theme for my own use. I don't think I have a knack for it but I can definitely share what i do.
I almost always start a layout with my pictures. This way, I can ensure that I'm focusing on my pictures. Then I choose my papers. That's right, I choose the papers that fit my pictures. At this point you may be wondering why I chose the Disney-themed paper for my pictures.
For the pictures above, for instance, I notice that my nephew J was in a baby blue bib and I was wearing dark colors. The background of the picture is my brother's house and it was bright and white because it was in the morning. It also showed a bit of his fancy kitchen.
In the selection process, I knew I wanted to have some blue in the background. Blue was actually my "must have" because I wanted baby J to be the focus. I knew that Magical has some blue so I took a look at it. There is a sheet of blue patterned paper, which is actually the back of the black paper I used above, showcasing a repeating pattern of tickets. I wanted to use that as a mat for my photos, but the patterns are quite too big to be shown as a border so that idea was aborted.
There is a white patterned paper with very small gray triangles repeating throughout the sheet. That is a perfect paper for photo mats - it has subtle patterns that bring interest but not too distracting; AND the patterns are small enough to be recognized. I brought that paper close to my photos and bingo!
Now that I've decided on the mats, I would love to use colors and patterns that show a contrast. The black patterned paper with camera motives was perfect. It's black background against the white-matted photos. That's the biggest contrast I can get in the world, right?
The next decision I made was to bring in blue to the page. At this point, I only have black and white! So I used a sheet of blue cardstock as the base of the page. I wanted to use the "Love this" 6*4 card as my title, so I naturally used two strips of red patterned paper to envelope the black background.
Throughout the whole process, I didn't do anything to "De-Disney" the paper. I focused on the pictures and find the right paper with the right pattern and colors to serve the purpose I wanted. And I must say, although the colors of Magical may suggest a lot of Disney, the patterns like ticket motif, cameras, triangles are very neutral. They are not Disney-bound. Some crafty friends turn away from Magical because they say they didn't have any Disney photos. But who says Magical is only good for a Disney trip?
So that's my paper selection process. I always focus on my pictures and try to use the papers that share common elements with my pictures. Did I mention that the sketch comes from Reflections, a great How-to book for scrapbooking? It helped a lot during the process! I knew from the beginning how many sheets I needed so I wouldn't have to search for more than necessary. :)
When we adopt the paper for our own use, we are making it more versatile and maximizing it. How nice!
Thanks for stopping by!
Monday, May 23, 2016
You are so Sweet
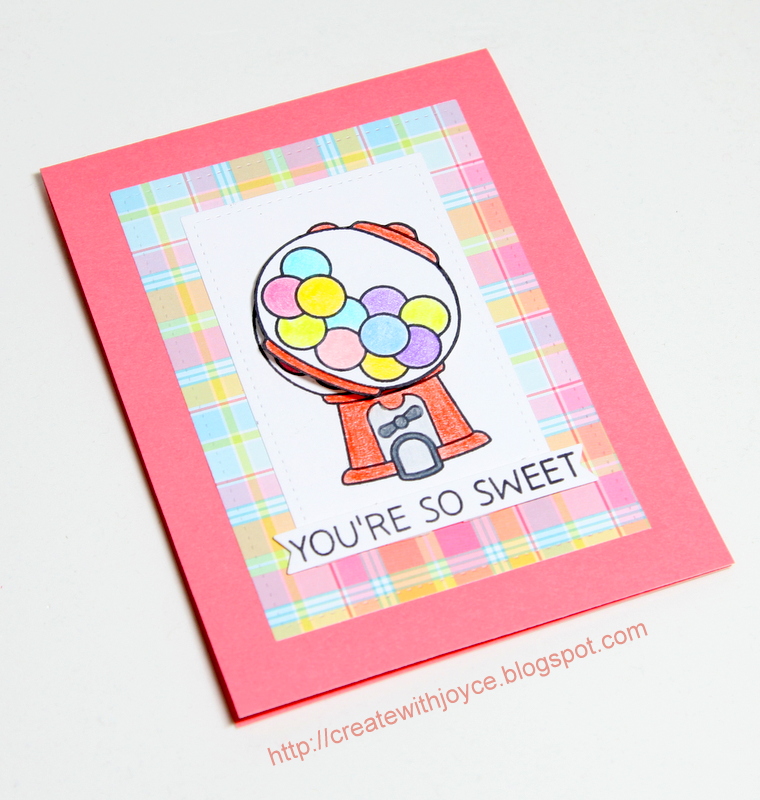
Ever since I spent a weekend with my niece and nephew last month, I have been thinking about making another visit. The kiddos grow so fast that I'm afraid if they don't see me frequently enough, they will forget me! :(
Before that happens, I am sending them a card. For my 3.5 year old niece R, I am giving her an interactive card:
It may not look like it's interactive, but when I lay it flat and after slightly swinging it:
I absolutely love the readily made wobblers but I actually made my own this time. It's so easy and convenient that I consider making these myself in the future. :)
My card is entering the following:
Less is More - Something that pops or bangs (The bubble gums do pop, though not when they are in their original shape).
613 Avenue Create - Anything Goes
Lil Patch of Crafty Friends - Anything Goes
Craft Your Passion - Anything Goes
Thanks for stopping by!
Before that happens, I am sending them a card. For my 3.5 year old niece R, I am giving her an interactive card:
It may not look like it's interactive, but when I lay it flat and after slightly swinging it:
I absolutely love the readily made wobblers but I actually made my own this time. It's so easy and convenient that I consider making these myself in the future. :)
My card is entering the following:
Less is More - Something that pops or bangs (The bubble gums do pop, though not when they are in their original shape).
613 Avenue Create - Anything Goes
Lil Patch of Crafty Friends - Anything Goes
Craft Your Passion - Anything Goes
Thanks for stopping by!
Friday, May 6, 2016
Homework
Today I'm sharing the homework I did for Clear and Sheer from Online Card Classes.
Sadly, I am a bad student. I have not even finished watching all the videos and today's already the last day of class! Oh no!
My two cards today involve embossing. Have you tried embossing on acetate cards or vellum cards? The results are stunning!
I turned them into two masculine cards. First up, a Thank You card:
Then a card for my dad:
If you are wondering what happened to the orange stars in the Thank You card, rest assured that your eyes are fine. It's just that I've put glossy accent over it but it has not completed dried. (Gotta take a picture of it before the end of the class..........)
I have been enjoying the lessons in this mini class. I would love to finish the lessons this weekend, together with some serious scrapbooking tomorrow, because it's National Scrapbooking Day! Yay!
I'm linking my Thank You card to the following:
Crafting by Designs - Anything Goes
Through the Purple Maze - Anything Goes
Cre8tive Hands Friends - Anything Goes
Crafting with an Attitude - Anything Goes
Thanks for stopping by and Happy Crafting!
Friday, April 15, 2016
Have a magical day!
Happy Friday and have a magical day!
Today I'm sharing a card that I made for my sister-in-law. Her birthday is in May but there are so many cards I have to send out in May so I have to start making them early.
I really like the Fairy Friends set from Lawn Fawn and decided to make a birthday card for my SIL with it. It's a window card again!
Today I'm sharing a card that I made for my sister-in-law. Her birthday is in May but there are so many cards I have to send out in May so I have to start making them early.
I really like the Fairy Friends set from Lawn Fawn and decided to make a birthday card for my SIL with it. It's a window card again!
I can't resist making window cards. They didn't involve a lot of effort but they sure do add a lot of interest!
In addition to using the Fairy Friends set, I also used the snow globe from Ready, Set, Snow, the sun and clouds from Hello Sunshine, flowers from Happy Easter, and the grassy border die. The perfectly plaid paper was a must for the background! It adds a lot of colors to the card!
I got to work on my cousin's birthday card next........my project for this weekend. :)
My card is linking to the following:
A bit more time to craft - anything goes
2 creative chicks - anything goes
Crafty gals corner - die cuts
Seize the birthday - birthday
Crafting with an attitude - anything goes
Thanks for stopping by and have a great weekend!
Monday, March 28, 2016
So Lovely
Sale PSA: Close to My Heart's Stampaganza (Buy Two Get One Free) campaign is ending this Thursday, the end of this Month. Even though I am the one who said I do not want to buy just because of a sale, I just put in an order with stamps and stamps only. This is a rare opportunity so take advantage of it.
Close to My Heart used to continue the production of all Cricut compatible stamps indefinitely. But it is changing its policy. Stamp sets will only be available during the life of the idea book where the stamps appear, even if it is a Cricut cartridge compatible stamp set. Further, all stamp sets in the current Seasonal Expressions will retire by end of April 2016. Some items, such as the thin cuts for this popular stamp set Springtime Wishes, were already sold out. So if you have been holding off, don't wait any longer as the hot items could be gone anytime soon.
A special stamp set Hello Paradise is only available until the end of this month. It is a cute stamp set with solid images that can be used for a variety of occasions. Close to My Heart has designed a few layouts with the use of this set. If you want to have a copy of it please contact me.
Today I'm sharing a layout. In particular, I'm taking this as an opportunity to answer a question I have received: how do you use certain themed paper for a completely differently themed layout? My simple answer is just go for it, have fun and adapt it to your need.
Some people think and feel that the Charlotte paper is wedding/romance themed. I do not disagree that some elements do remind us of love, wedding, bliss, etc. but look beyond those elements. What about the color scheme? What about the patterns? I have made numerous pages using this paper pack but none of them is wedding/love themed. For the one I'm sharing today, I used it on a layout for pictures I took at the awards banquet in last year's Convention:
See the 4x6 black cut- apart card on the right? It says "Home is wherever I'm with you." But I've covered up the text with another cut-apart card that only has arrows on it. They make quite a good match because the 4x6 black card also has some arrows. Another cut-apart card is full of lovely flowers, which can be used for all occasions anyway. I then grounded these elements with the label strip which has stripes only. Had I not told you about it, who would know that it was designed for weddings? These patterns are so versatile, and it will be a waste if we limit it to the use for weddings!
Next time if you turn down a paper collection because you do not like its theme, look beyond that and see if there are other elements that you like - motif, colors, patterns.
I'm entering my layout to the challenge at The Paper Girls - Paper Girls. What's better to capture an exciting moment where the crafty girls were taking pictures at the beginning of the banquet?
Thanks for stopping by!
Close to My Heart used to continue the production of all Cricut compatible stamps indefinitely. But it is changing its policy. Stamp sets will only be available during the life of the idea book where the stamps appear, even if it is a Cricut cartridge compatible stamp set. Further, all stamp sets in the current Seasonal Expressions will retire by end of April 2016. Some items, such as the thin cuts for this popular stamp set Springtime Wishes, were already sold out. So if you have been holding off, don't wait any longer as the hot items could be gone anytime soon.
A special stamp set Hello Paradise is only available until the end of this month. It is a cute stamp set with solid images that can be used for a variety of occasions. Close to My Heart has designed a few layouts with the use of this set. If you want to have a copy of it please contact me.
Today I'm sharing a layout. In particular, I'm taking this as an opportunity to answer a question I have received: how do you use certain themed paper for a completely differently themed layout? My simple answer is just go for it, have fun and adapt it to your need.
Some people think and feel that the Charlotte paper is wedding/romance themed. I do not disagree that some elements do remind us of love, wedding, bliss, etc. but look beyond those elements. What about the color scheme? What about the patterns? I have made numerous pages using this paper pack but none of them is wedding/love themed. For the one I'm sharing today, I used it on a layout for pictures I took at the awards banquet in last year's Convention:
See the 4x6 black cut- apart card on the right? It says "Home is wherever I'm with you." But I've covered up the text with another cut-apart card that only has arrows on it. They make quite a good match because the 4x6 black card also has some arrows. Another cut-apart card is full of lovely flowers, which can be used for all occasions anyway. I then grounded these elements with the label strip which has stripes only. Had I not told you about it, who would know that it was designed for weddings? These patterns are so versatile, and it will be a waste if we limit it to the use for weddings!
Next time if you turn down a paper collection because you do not like its theme, look beyond that and see if there are other elements that you like - motif, colors, patterns.
I'm entering my layout to the challenge at The Paper Girls - Paper Girls. What's better to capture an exciting moment where the crafty girls were taking pictures at the beginning of the banquet?
Thanks for stopping by!
Tuesday, March 15, 2016
Celebrate!
Hi everyone!
Today I'm sharing a technique that I like a lot but do not get to play with too often - stamp kissing!
Here, I inked up the solid balloon image from Workshops on the Go Kaleidoscope Cardmaking Kit and stamp on the Charming Cascades stamp. Thus, the stars have absorbed some of the inks on the balloon, and when I stamped the balloon on paper, you see tiny little stars on the balloon. I love this technique and I'm not sure why I'm not playing with it more often. LOL.
I used the same cascade of star image in the Charming Cascades set as a background. I inked it up in Pear and the background cardstock is also Pear. This tone-on-tone technique never fails me - it always adds interest and is so easy to do! Love this technique too!
My card is entering the following:
Dream Valley - Birthday
Craft your passion - Anything Goes
Not Just Cards - Anything Goes
Crafty Cardmakers - Go Green
Thanks for stopping by!
Sunday, March 6, 2016
Birdies
Have you seen Sunshine Birdies, stamp of the Month at Close to My Heart?
I've made a card with it using a sketch I've used a million times and am still in love with:
You may be thinking that the birdie on my card does not look the same as the one you see on the website. No worries, your eyes are perfectly fine. When I fussy cut it out, I realized that he is a tad bit too big on the card, so I trimmed off his tail. And yes, I cut out his feather on his crown too. I figured that it would look odd with just one feather after I've cut it out, so removing it would be the easiest thing to do.
I've used the music notes in the stamp set to create my own background. Tone-on-tone technique is my favorite trick to add subtle interest to an otherwise plain cardstock.
In case you are wondering, the sketch came from Make it from Your Heart Part I. There are many card and layout sketches on the internet, but this book is truly awesome. It is affordable and jam-packed with pictures of beautiful projects. Every time when my mojo is low I will be instantly inspired just by flipping it through. Furthermore, I like that it has dimensions and cutting guides provided. No guesswork at all! I wll be honest that although sometimes I like the adventure to use sketches only as a reference guide, I do not always like the end product that I made because something seems unproportional. There are moments that I did it right the first time and was extremely excited about it but I'm afraid it does not happen that often. Thus I truly appreciate the dimension and cutting guide of the How-to books offered by Close to My Heart.
This card is going to a very dear friend of mine, who helped me a big time. I can never thank her (and her family) enough. I didn't want to send a thank you card, because a card like this will be more special.
I'm entering my card to the following:
Kitty Bee Designs - in the garden
Crafting with Dragonflies - Girly cards
Crafty Calendar - Special female
Thanks for stopping by and Happy Crafting!
I've made a card with it using a sketch I've used a million times and am still in love with:
You may be thinking that the birdie on my card does not look the same as the one you see on the website. No worries, your eyes are perfectly fine. When I fussy cut it out, I realized that he is a tad bit too big on the card, so I trimmed off his tail. And yes, I cut out his feather on his crown too. I figured that it would look odd with just one feather after I've cut it out, so removing it would be the easiest thing to do.
I've used the music notes in the stamp set to create my own background. Tone-on-tone technique is my favorite trick to add subtle interest to an otherwise plain cardstock.
In case you are wondering, the sketch came from Make it from Your Heart Part I. There are many card and layout sketches on the internet, but this book is truly awesome. It is affordable and jam-packed with pictures of beautiful projects. Every time when my mojo is low I will be instantly inspired just by flipping it through. Furthermore, I like that it has dimensions and cutting guides provided. No guesswork at all! I wll be honest that although sometimes I like the adventure to use sketches only as a reference guide, I do not always like the end product that I made because something seems unproportional. There are moments that I did it right the first time and was extremely excited about it but I'm afraid it does not happen that often. Thus I truly appreciate the dimension and cutting guide of the How-to books offered by Close to My Heart.
This card is going to a very dear friend of mine, who helped me a big time. I can never thank her (and her family) enough. I didn't want to send a thank you card, because a card like this will be more special.
I'm entering my card to the following:
Kitty Bee Designs - in the garden
Crafting with Dragonflies - Girly cards
Crafty Calendar - Special female
Thanks for stopping by and Happy Crafting!
Friday, February 26, 2016
Hello!
Hello and Happy Friday!
Last week I shared a card that used a rainbow of colors. Today I'm sharing another one:
It is actually quite fun to make this card. I first stamped the floral background called Botanical Backgrounds with Versamark ink and heat set it with white embossing powder. Then I masked off the panel with masking tape and used little sponge daubers and ink pads to ink up the entire panel. Same as last week's card, the color palette is: Pixie, Sunset, Canary, Pear, Glacier and Gypsy.
Then I cut out the word Hello using Cricut Explore and the font from Artiste cartridge, put the panel on a black note card, and it's finished.
I'm linking up my card to the following challenges:
Crafting with Friends - Anything Goes
Crafting with an Attitude - Anything Goes
Simply Papercraft - Anything Goes
Crafty Girls Creations - Anything Goes
Thanks for stopping by!
Friday, February 19, 2016
Colorful birthday card
A quick post here to share a kid's birthday card. I used Balloon Animals, the current Stamp of the Month and Brushstrokes to create this card:
Because the balloon giraffe is a solid image, I think stamping it in black against a colorful background would make it pop and sure it did! I used the brushstroke image with a rainbow of colors: Pixie, Sunset, Canary, Pear, Glacier and Gypsy. Oh yes, there are only six colors in my rainbow. That is a better proportion for the giraffe!
My card is linking up to the following:
DoubleClick - Happy Birthday
Seize the Birthday - Birthday themed
Brown Sugar - Anything Goes
Chocolate, Coffee and Cards - Anything Goes
Crafting with Friends - Anything Goes
Heart 2 Heart - Party Animals
Happy Crafting and have a great weekend!
Because the balloon giraffe is a solid image, I think stamping it in black against a colorful background would make it pop and sure it did! I used the brushstroke image with a rainbow of colors: Pixie, Sunset, Canary, Pear, Glacier and Gypsy. Oh yes, there are only six colors in my rainbow. That is a better proportion for the giraffe!
My card is linking up to the following:
DoubleClick - Happy Birthday
Seize the Birthday - Birthday themed
Brown Sugar - Anything Goes
Chocolate, Coffee and Cards - Anything Goes
Crafting with Friends - Anything Goes
Heart 2 Heart - Party Animals
Happy Crafting and have a great weekend!
Friday, January 15, 2016
Cheers!
I know that my friend has received and seen the card so I can finally post it here!
It is actually the very first card I made in 2016 and it's a birthday card for a dear friend:
Does this card look somehow familiar to you? You may have seen a love card on Jennifer McGuire's blog. I've used many of the design elements from Jennifer McGuire's card here. Her card is fabulous and after I have seen it on her blog and her video, I wanted to make one using my own supplies.
I wanted to make a birthday card for a guy friend rather than a love card so I've used a star shape as the window. I've used the Lawn Fawn stackable star dies here. The dies do not have the details on the edge that Jennifer's heart die does, so I've created a frame for the window. A nice thing about these stackable dies is that you could create a border easily. Just nest a smaller one inside the other and run through the machine and the resulting frame looks as if you have made it from a frame die! :)
I do not have sequins in the "right color" but I have quite a few star wood veneers. So I've colored the tiny wood veneers in red using a Sharpie and sealed the pocket with my fuse tool. I used blue glitter paper to make the "cheers" die cut and white embossed the sentiment Happy Birthday on a blue strip of banner. I added a few more glittery stars on the card front to finish it off.
Head over to Jennifer's blog to see her awesome card. Her blog is constantly inspiring me in many different ways and I'm sure it will inspire you too!
Thanks for stopping by and Happy Crafting!
It is actually the very first card I made in 2016 and it's a birthday card for a dear friend:
Does this card look somehow familiar to you? You may have seen a love card on Jennifer McGuire's blog. I've used many of the design elements from Jennifer McGuire's card here. Her card is fabulous and after I have seen it on her blog and her video, I wanted to make one using my own supplies.
I wanted to make a birthday card for a guy friend rather than a love card so I've used a star shape as the window. I've used the Lawn Fawn stackable star dies here. The dies do not have the details on the edge that Jennifer's heart die does, so I've created a frame for the window. A nice thing about these stackable dies is that you could create a border easily. Just nest a smaller one inside the other and run through the machine and the resulting frame looks as if you have made it from a frame die! :)
I do not have sequins in the "right color" but I have quite a few star wood veneers. So I've colored the tiny wood veneers in red using a Sharpie and sealed the pocket with my fuse tool. I used blue glitter paper to make the "cheers" die cut and white embossed the sentiment Happy Birthday on a blue strip of banner. I added a few more glittery stars on the card front to finish it off.
Head over to Jennifer's blog to see her awesome card. Her blog is constantly inspiring me in many different ways and I'm sure it will inspire you too!
Thanks for stopping by and Happy Crafting!
Sunday, November 8, 2015
Share Handmade Kindness
Jennifer McGuire has a Share Handmade Kindness challenge on her blog and it came at the time where I am about to make a Thank You card to my friend.
I want to make this Thank You card more special - one without the phrase "Thank You" on it. This is what I've made:
She is indeed one of a kind and I can't tell how she can manage everything so well in her life. She has a full time job, two small kids, leads an important role at church and spends time with her girlfriends (including me) and lends a hand to us without us having asked.
I was inspired by Kristina Werner's card here to make my own (speaking of that, I wanted to leave her a comment about her inspiration but I couldn't find the comments section of that blog post. If you happen to know how to do that, please let me know!) I do have the stamp sets that she used, but I love the new Close to My Heart Diamonds are Forever stamp set and thought I could make a card full of diamonds.
I stamped the diamonds with the following colors: Poppy, Sunset, Goldrush, Honey and Canary. I like these colors! After making this card, I like it so much that I also made a masculine version:
This one made use of Pear, Lagoon, Crystal Blue. I love them both. :)
My feminine version is entering the following challenges:
Share Handmade Kindness
Simply Create Too - Give Thanks
Simply Papercrafts - Anything Goes
Thanks for stopping by!
I want to make this Thank You card more special - one without the phrase "Thank You" on it. This is what I've made:
She is indeed one of a kind and I can't tell how she can manage everything so well in her life. She has a full time job, two small kids, leads an important role at church and spends time with her girlfriends (including me) and lends a hand to us without us having asked.
I was inspired by Kristina Werner's card here to make my own (speaking of that, I wanted to leave her a comment about her inspiration but I couldn't find the comments section of that blog post. If you happen to know how to do that, please let me know!) I do have the stamp sets that she used, but I love the new Close to My Heart Diamonds are Forever stamp set and thought I could make a card full of diamonds.
I stamped the diamonds with the following colors: Poppy, Sunset, Goldrush, Honey and Canary. I like these colors! After making this card, I like it so much that I also made a masculine version:
This one made use of Pear, Lagoon, Crystal Blue. I love them both. :)
My feminine version is entering the following challenges:
Share Handmade Kindness
Simply Create Too - Give Thanks
Simply Papercrafts - Anything Goes
Thanks for stopping by!
Subscribe to:
Posts (Atom)