Monday, August 11, 2014

Graphic stamps again

I am sharing another card made with graphic stamps!  I am very inspired to make more cards with graphic stamps even though they were not my favorite but now that I've learned some techniques from Stretch Your Stamps 2 I would like to challenge myself to use them more often.


Isn't it a great clean and simple masculine card?  I think so.  The color combo certainly suggests masculine, the font of the sentiment is straight-forward and to tell you the truth, I've actually removed the enamel dots after putting them on.  Fortunately the adhesive behind the enamel dots is rather weak so the removal did not leave any marks. 

Because it is so simple, it is importantly to ensure that the stamping is crisp and clean.  Every minute flaw could be magnified in a simple card like this.  After stamping the pattern, I went back to double stamp on them so the coverage is good.  Nothing bothers me more than a crooked sentiment in a card like this.  I am a big fan of starting with the sentiment.  Who wants to repeat the hard work because of a crooked sentiment?  I forgot to do it this time (because the card was quite an experiment for me) but I was fortunate that I got the sentiment right the first time! :)

In case you've missed it, please check out the feminine version of a Thank You card using the same stamp set here.

I'm linking up my card to the following:
The Squirrel and the Fox - Anything Goes
Stamping Sensations - Anything Goes
Robyn's Festish - Anything Goes
PR Design - Masculine card
Crafting from the Heart - Anything Goes

Thanks for stopping by!

Thanks with Graphic stamps

Just a quick post showing what I did with my set from Avery Elle.  I made a background out of it!


I am normally not appealed to using graphic stamps but Stretch Your Stamps 2 does give us some great ideas!  This is my first attempt using this set and I had ideas in my head to make more cards!  For this card, after making the background I just used the die cut "thanks" from Lawn Fawn, added some Wink of Stella glitter and Glossy Accents to give it dimension.  Quick and easy and simple!  Guess what?  I'm going to switch it up to another color combo to make it a masculine card!  Yay!

I'm linking up my card to
Crafty Girls Challenge - Anything Goes
Crafty Calendar - Anything Goes
Suzie Bee's Bloomin - Anything Goes
Time 4 Scrap - Anything Goes
Treasured Times Stamps - Anything Goes

Thanks for stopping by!

Happy Birthday

I am speeding up the typing for this post as I have to rush out for work!  Please excuse any errors.  This post should have gone live yesterday but alas, that's the fate of procrastination!

I'm playing with three things that I have not played for a long time.  One is sticky back canvas.  I almost forgot where I had this good stuff.  This card shows a resist technique where white embossed flower is showing through the canvas that was heavily colored with Peacock Feather distress stain:


Now that I got the sticky back canvas done.  What do i do?  The easiest thing is to get a sketch for it!  I got this sketch from Freshly Made Sketches.  Boy it has been the longest time I can remember since I last played this challenge:


The third thing to which I have not given love is my buttons!  I have my buttons nicely stashed away in a neat box.  The box was sitting quietly in the corner of a drawer when I retrieved.  Poor thing.  The sketch provides for some space in the middle panel and I think that's a good place for buttons!  I threaded through some waxy flax so the holes are covered to give a more finished look.

That's about it for this card.  I'm also linking up my card to Dies R Us - Birthday and Crafty Calendar - Anything Goes.

Thanks for stopping by!

Friday, August 8, 2014

Pink Christmas

My favorite Christmas color combination remains the traditional one - red, green, and perhaps with a pop of gold.  I love making Christmas cards and albums in these colors but once in a while I'd like to make things rather non-traditional.

Let's take a look at this pink Christmas card:


There are many shades of pink here: I first used Spun Sugar distress ink with my favorite Tim Holtz Harlequin Layering Stencil to create the background.  The layering stencil is not wide enough to cover the whole card but never fear, the  pattern is so easy to line up to create a continuous background.  Then I used the Lawn Fawn Milo ABC set to stamp "XMAS" in each diamond.  Over at Stretch Your Stamps 2 we are talking about alphabet stamps.  I like to use them as background but I don't want the background to be just letters.  Here, by secretly sneaking them in with the camouflage Hear Arts Bubble Gum, they become part of the background and part of the sentiment "Merry Christmas."  Of course, I like to mix and match my supplies too.  I like that the distress family blends well with the whimsical Lawn Fawn stamps!

I do not have the matching cardstock for the word "merry" so I used direct to paper method to ink up the cardstock using the Spun Sugar distress ink and die cut the word out.  Oh enamel dots!  How can I have not used them earlier!  Everyone raves about enamel dots and I jumped on the bandwagon too.  I do like these rather flat embellishments that still give interest to my card.

I'm linking up my card to the following:
Creative Card Crew - Christmas
Holly Jolly Christmas - Anything Goes with Non-Traditional colors
Southern Girls Challenge - Christmas
Completely Christmas - Anything Goes
Winter Wonderland - Christmas
Craft for the Craic - an item that I have not used before (Enamel dots)
Crafts 4 Eternity - Anything Goes

Thanks for stopping by!

Thursday, August 7, 2014

Hello

Before the end of the summer, I should send out my last round of Hello cards - many of them have bright colors and I really want them to be received in time!

I'm sharing one that was made when I was on the analogous color kick:


I first white heat embossed the background stamp on plain old white cardstock, then apply distress inks onto the panel.  I did flick some water onto it so the strips of color blend well.   I like this color combo - Picked Raspberry, Spiced Marmalade and Mustard Seed.  I've probably added some Squeezed Lemonade too.   And you know me, I love window cards.  Window cards just make everything nicer and everyone (especially me) happier.  So I cut through two layers of cardstock (the colored panel and the card base) with a heart die.  Finally I die cut the Lawn Fawn Scripty Hello die in navy cardstock and stick it across the heart.

I did want to add shimmer or even glossy accents onto the word Hello but I decided against it eventually.  If you see this card here closely, you may see that the word Thanks tend to curl up a bit.  It was fine in this thanks card because the entire word was stuck down on a flat surface.  In this card here, however, the word hello is just having very little supporting area for it.  I can't risk the word coming off when it curls up!

My card is linking up to the following:
Kraftin Kimmie Challenge - Anything Goes
Milk Coffee Challenge - two or more die cuts
Creative Moments - Anything Goes
Little Red Wagon - Embossing
Penny's Paper-Crafty - Anything Goes

Thanks for stopping by!

Wednesday, August 6, 2014

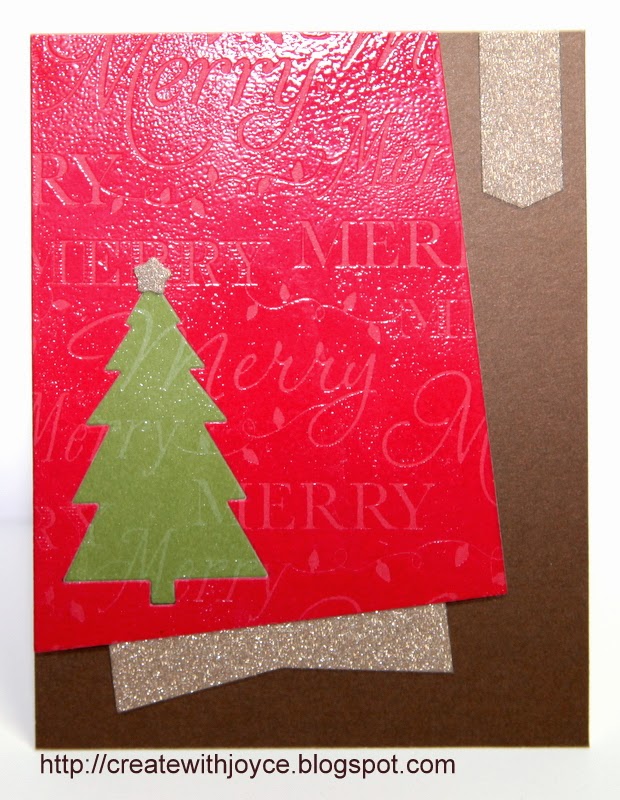
Background stamp & die-cut inlay = fun

Over at Online Card Classes there is a class called Stretch Your Stamps 2.  It is a class designed to help us stampers use our stamps more creatively to get more mileage out of the stamps.

The first two days of class focus on background stamps.  I dug out my old Hero Arts Merry background stamp to create this card:


I thought the picture above would show you better what I did.  I heat embossed this image with clear embossing powder on both a red and a green cardstock, then I die cut out the tree from both of them in the same position of the stamp.  I put the green tree into the negative piece of the red embossed panel. The two pieces fit together perfectly to form a flat piece.  I used the My Favorite Things Blueprints die 15  to create the tip topped panel, added the pennants with glitter paper, and a star to finish off the card.

From far away this card looks very plain and simple but when you look closely you see how fun it is to have a die cut inlay in a big background.  :)

Now let's see the card in its upright position.  You can still see that the letters align perfectly well:


My card is linking up to the following:

Creative Card Crew - Christmas
Stamps and Fun - Christmas in summer
Christmas cards all year round - Sparkle and Shine
CHNC Challenge extra - Christmas
CHNC - reach for the stars
Sparkles Monthly Challenges - Christmas in July

Thanks for stopping by!

Sunday, August 3, 2014

A Vintage Christmas Card

In this hot summer I'm sharing a Christmas card:


It is based on the sketch at Atlantic Hearts Sketch Challenge:


I did want to use the sketch like it is shown above.  I've even gathered some of my favorite butterfly stamps and the paper that goes well with those stamps.  But I didn't like them.  So I rotated the sketch counterclockwise for 90 degrees and made a Christmas card.  Butterfly stamps, let's wait for next time. :)

It is almost impossible (at least for me) to stamp once to get the horses and sleigh image complete.  So I stamped it twice - once on the background paper and once on the red strip with embossing ink, then emboss both with ultra fine black embossing powder, then line up the two so they appear to be one image. 

I love silhouette stamps.  They appeal magically to me.  When I saw this set designed by Tim Holtz last year I bought it immediately.  He has just released this year's Christmas sets and I guess my bank will be broken.  Hahaha~ 

My card is linking up to the following:
My Perfect Life - Christmas card
A Gem of a Challenge - Embossing
Completely Christmas - Anything Goes
Left of Center - Christmas in August
Winter Wonderland - Anything Christmas
Fantastic Tuesday - Anything Goes
Through the Craft Room Door - Anything Goes
Atlantic Hearts Sketch Challenge - see above image

Thanks for stopping by!