Hip! Hip! Hooray!
I'm back today to share my card using Balloon Animals, Stamp of the Month of February of Close to My Heart.
I had many ideas in my head but I couldn't resist using another sketch from Make it from your Heart II. These how-to programs are time-savers! They are also my source of inspiration when I need it. :) I can't help but using the Zoe paper packet. The fun and bright colors are perfect for this party/celebration themed stamp set. It turned out cute and I hope you like it too!
My card is linking up to the following:
Creative Knockouts - Birthday wishes
Seize the Birthday - Birthday
QKR Stampede - One for the kids
Suzy Bee's Bloomin' - Add an animal
Amusing Challenge - Anything Goes
613 Avenue Create - Anything Goes
Addicted to stamps - Anything Goes
Thanks for stopping by!
Tuesday, February 2, 2016
Monday, February 1, 2016
February promotions
Share the love this February by purchasing the exclusive My Acrylix® Share the Love D-size stamp set (CC1060). Filled with adorable icons and loveable sentiments, this stamp set will be a beautiful addition to your collection—but there is more to this stamp set than meets the eye! Not only will you be getting a high-quality, swoon-worthy stamp set by taking part in this promotion, but Close To My Heart will also donate $7 USD of the proceeds from this stamp set to Operation Smile™, an amazing organization that provides surgeries to repair cleft lips and palates for children all over the world*! Check out our social media channels all month long to see this stamp set in action, and remember to post your own artwork using the hashtag #ctmhsharethelove to help bring attention to a wonderful and worthy cause.
If you want to see all the images of the set, please click here.
Stamp of the Month in February is Balloon Animals - a fun stamp set that's perfect for kid's birthday but will be great for many other occasions. You can see all the images of this set here.
I'll be sharing a birthday card using this set very soon. Stay tuned!
Friday, January 29, 2016
Happy Friday!
I said I'm on a masculine card kick and it's still going strong!
Although I think this one would be just as nice for a girl. Well, I might use Sorbet color for the sentiment and use hearts instead of stars for embellishment.
I've used one of the sketches from Make it from Your Heart for this card. Love that the book even provides dimensions for each piece to be cut. That makes it really quick and easy.
The Zoe paper packet was first released in August last year and I heard that it has been one of the top selling paper packets. I am not surprised. It is so versatile. I like that it has patterns and color combination that work well for a wide variety of projects.
My card is linking up to the following:
Crafty Gals Corner - Anything Goes
Crafty Girls - Anything Goes
Craft Rocket - Clean and Simple
Southern Girls - Anything Goes
Thanks for stopping by and Happy Crafting!
Although I think this one would be just as nice for a girl. Well, I might use Sorbet color for the sentiment and use hearts instead of stars for embellishment.
I've used one of the sketches from Make it from Your Heart for this card. Love that the book even provides dimensions for each piece to be cut. That makes it really quick and easy.
The Zoe paper packet was first released in August last year and I heard that it has been one of the top selling paper packets. I am not surprised. It is so versatile. I like that it has patterns and color combination that work well for a wide variety of projects.
My card is linking up to the following:
Crafty Gals Corner - Anything Goes
Crafty Girls - Anything Goes
Craft Rocket - Clean and Simple
Southern Girls - Anything Goes
Thanks for stopping by and Happy Crafting!
Monday, January 25, 2016
Masculine Thank You card
I'm on a masculine card kick and am sharing a masculine Thank Your card today.
I want to make it more playful so I used my Lawn Fawn goodies to make this card:
I was really hoping to use the "Float My Boat" set to make this card so I started with that. The next thing I knew was that I have the Ocean Wave Borders die which should go well with this stamp set so I took that out as well. Because of the wave borders I decided to use the boat image. Then I thought different shades of blue would be great for masculine card so I gathered my blue cardstock sheets. To give the boat more interest, I did some paper piecing. I added red cardstock pieces to the sail of the boat.
It is a standard A2 size card but just the boat on different shades of blue waves would make the card bare. So I used the stitched journaling card die to draw our attention to the center of the card. I added a sun and two clouds from Spring Showers die, stamped "Thanks!" on one of the clouds and it's done!
My card is entering the following:
Amusing Challenge - Shades of Blue
Addicted to Stamps - Masculine
613 Avenue - Anything Goes
Stamping Sensations - with a die
Fashionable Stamping - Thanks/Gratitude
Thanks for stopping by and Happy Crafting!
I want to make it more playful so I used my Lawn Fawn goodies to make this card:
I was really hoping to use the "Float My Boat" set to make this card so I started with that. The next thing I knew was that I have the Ocean Wave Borders die which should go well with this stamp set so I took that out as well. Because of the wave borders I decided to use the boat image. Then I thought different shades of blue would be great for masculine card so I gathered my blue cardstock sheets. To give the boat more interest, I did some paper piecing. I added red cardstock pieces to the sail of the boat.
It is a standard A2 size card but just the boat on different shades of blue waves would make the card bare. So I used the stitched journaling card die to draw our attention to the center of the card. I added a sun and two clouds from Spring Showers die, stamped "Thanks!" on one of the clouds and it's done!
My card is entering the following:
Amusing Challenge - Shades of Blue
Addicted to Stamps - Masculine
613 Avenue - Anything Goes
Stamping Sensations - with a die
Fashionable Stamping - Thanks/Gratitude
Thanks for stopping by and Happy Crafting!
Friday, January 22, 2016
Quick and easy masculine cards
If you are like me, you may find it more difficult to make a card for a man than for a woman. I don't care which age group this man belongs to, or whatever card I'm making for him, I know for a fact that this card is going to take me much longer than the same type of card for a woman in the same age group.
The nautical themed collection Regatta from Close to my Heart helped me make two quick and easy masculine cards. They are simple yet perfect for a masculine card.
I've used the cut apart sheet of Regatta patterned paper on both cards:
The greeting "today is a good day" comes from the stamp set "All the Details". They turned out pretty nice. :)
I said the projects I've made with the Regatta collection have nothing to do with sea, beach or vacation. Today's cards are examples of how I've used it.
My card is entering the following:
Cute Card Thursday - Just Boys
Creative Knockouts - Embossed delight
Crafty Girls Creations - Anything Goes
Crafting with an Attitude - Anything Goes
Craft Rocket Challenges - Clean and Simple
Thanks for stopping by and Happy Crafting!
The nautical themed collection Regatta from Close to my Heart helped me make two quick and easy masculine cards. They are simple yet perfect for a masculine card.
I've used the cut apart sheet of Regatta patterned paper on both cards:
The greeting "today is a good day" comes from the stamp set "All the Details". They turned out pretty nice. :)
I said the projects I've made with the Regatta collection have nothing to do with sea, beach or vacation. Today's cards are examples of how I've used it.
My card is entering the following:
Cute Card Thursday - Just Boys
Creative Knockouts - Embossed delight
Crafty Girls Creations - Anything Goes
Crafting with an Attitude - Anything Goes
Craft Rocket Challenges - Clean and Simple
Thanks for stopping by and Happy Crafting!
Monday, January 18, 2016
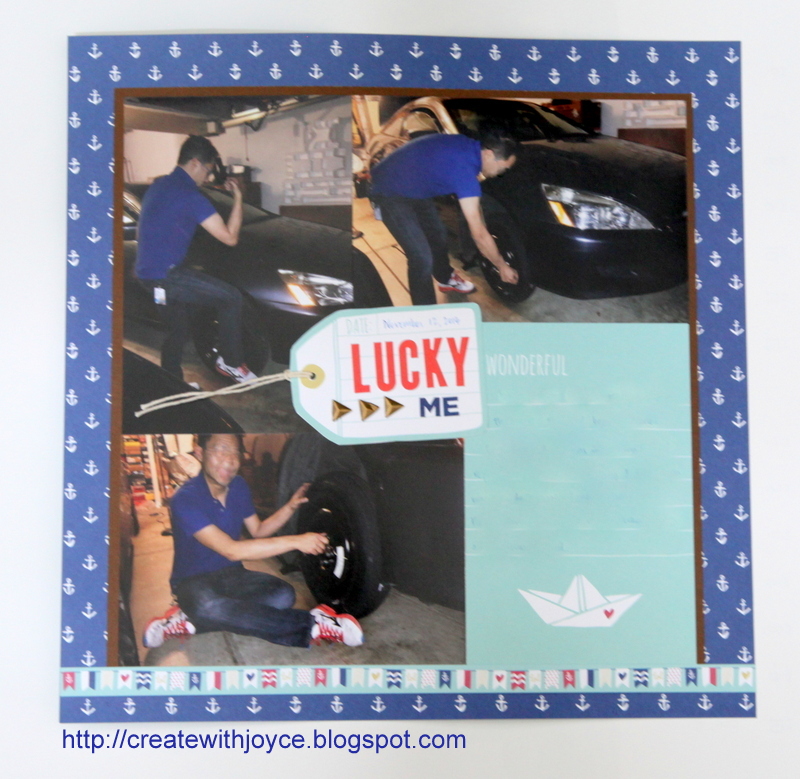
Lucky Me
Anyone enjoying a long weekend because today is Martin Luther King's Day?
I have to go to work today and I envy those of you who have a 3-day weekend!
I mentioned before that the Regatta Collection from Close to My Heart has a nautical theme but the layouts I made didn't have anything to do with the sea, beach, or anything in that regard.
One of the layouts I made with Regatta Workshops Your Way captures the story that I was so lucky to have made it to my friend's place even though I wasn't aware of a flat tire! I was even more lucky to have my friend R to put on the spare tire for me. Oh yes, you can tell what kind of driver I was............
I really like the cut-apart sheets in the new Workshops Your Way. This 4x6 card gives the perfect place for journaling. Some people may think it's a bit weird to use a sheet with so many anchors and a journaling card with a boat on a layout about fixing a car. I do not mind that at all. I like that the Sapphire color matches well with the shirt my friend R was wearing. He certainly floated my boat and the boat on the journaling card could be used to depict that as well.
I was once very rigid about the use of patterned paper on my layouts. That became part of the reason I have accumulated a lot of patterned paper over the years, because I had been waiting for the perfect pictures to use the paper. Last year when I returned to focusing more on scrapbooking and albums, I came to realize that it would only kill the joy of scrapbooking. I do not follow those rigid rules (that were imposed by myself, anyway) anymore, and take the liberty to use patterned paper more loosely. The result? I'm enjoying it a lot more, capturing many more stories than before, and having a lot more fun documenting life.
If you are like my old self, take a deep breath and let go of those boundaries. Matchy-matchy is good, but don't waste time on waiting for the perfect occasion while you could be having fun telling the stories now. :)
Thanks for stopping by and Happy Crafting!
Friday, January 15, 2016
Cheers!
I know that my friend has received and seen the card so I can finally post it here!
It is actually the very first card I made in 2016 and it's a birthday card for a dear friend:
Does this card look somehow familiar to you? You may have seen a love card on Jennifer McGuire's blog. I've used many of the design elements from Jennifer McGuire's card here. Her card is fabulous and after I have seen it on her blog and her video, I wanted to make one using my own supplies.
I wanted to make a birthday card for a guy friend rather than a love card so I've used a star shape as the window. I've used the Lawn Fawn stackable star dies here. The dies do not have the details on the edge that Jennifer's heart die does, so I've created a frame for the window. A nice thing about these stackable dies is that you could create a border easily. Just nest a smaller one inside the other and run through the machine and the resulting frame looks as if you have made it from a frame die! :)
I do not have sequins in the "right color" but I have quite a few star wood veneers. So I've colored the tiny wood veneers in red using a Sharpie and sealed the pocket with my fuse tool. I used blue glitter paper to make the "cheers" die cut and white embossed the sentiment Happy Birthday on a blue strip of banner. I added a few more glittery stars on the card front to finish it off.
Head over to Jennifer's blog to see her awesome card. Her blog is constantly inspiring me in many different ways and I'm sure it will inspire you too!
Thanks for stopping by and Happy Crafting!
It is actually the very first card I made in 2016 and it's a birthday card for a dear friend:
Does this card look somehow familiar to you? You may have seen a love card on Jennifer McGuire's blog. I've used many of the design elements from Jennifer McGuire's card here. Her card is fabulous and after I have seen it on her blog and her video, I wanted to make one using my own supplies.
I wanted to make a birthday card for a guy friend rather than a love card so I've used a star shape as the window. I've used the Lawn Fawn stackable star dies here. The dies do not have the details on the edge that Jennifer's heart die does, so I've created a frame for the window. A nice thing about these stackable dies is that you could create a border easily. Just nest a smaller one inside the other and run through the machine and the resulting frame looks as if you have made it from a frame die! :)
I do not have sequins in the "right color" but I have quite a few star wood veneers. So I've colored the tiny wood veneers in red using a Sharpie and sealed the pocket with my fuse tool. I used blue glitter paper to make the "cheers" die cut and white embossed the sentiment Happy Birthday on a blue strip of banner. I added a few more glittery stars on the card front to finish it off.
Head over to Jennifer's blog to see her awesome card. Her blog is constantly inspiring me in many different ways and I'm sure it will inspire you too!
Thanks for stopping by and Happy Crafting!
Subscribe to:
Posts (Atom)